by Paul Lamontagne and Danita Zanrè
In this final article we will discuss how to deploy the GroupWise client using Desktop Management software with a focus on ZENWorks Configuration Management (ZCM).
Most customers find that upgrading the GroupWise client is the last thing they do, simply because it seems to be time consuming and requires a lot of pre-planning. Smaller sites will have desktop administrators move from desktop to desktop to install the new GroupWise client. Other sites will want more automated solutions, such as using ZCM.
Choosing Your Windows Client Installation Method
As previously discussed (OHM33, p9-15) there are several methods that can be used to upgrade your users to the new GroupWise 2014 R2 Windows client. namely:
- Manual installation
- Auto-Update Direct POA Access
- Auto-Update with POA Access through a Web Server
- Update through SETUPIP
- Pushing the Client Upgrade through ZCM
This article discusses just the final option. If you use ZCM to manage applications for your users, you can push down the client through ZCM with no intervention by the user.
Upgrading Users with ZENworks Configuration Management
The following information is applicable to ZENworks Configuration Management (ZCM) 10.3 through 11.3. If you have earlier versions of ZCM, these instructions may not work in your environment. We will not cover any other ZCM versions for this guide. Also, we will not cover every permutation of ZCM that you might need for installing GroupWise. If you are using ZCM, we assume you are familiar with the ZCC dialogs, and that you know how to assign your own relationships and requirements to your application bundles.
The steps below are only intended to show the part of the ZCM setup that is specific to the GroupWise Windows client installation. Please note that there are no new versions of the Mac or Linux client.
The first thing that we do when preparing the GroupWise client for ZCM is to generate the GroupWise MST file required for the installation. This is done by using the gwtuner.exe file that is supplied with GroupWise 2014 R2. The gwtuner.exe file is found in both the Linux and Windows distributions in <installationfiles>\admin\utility\tools.
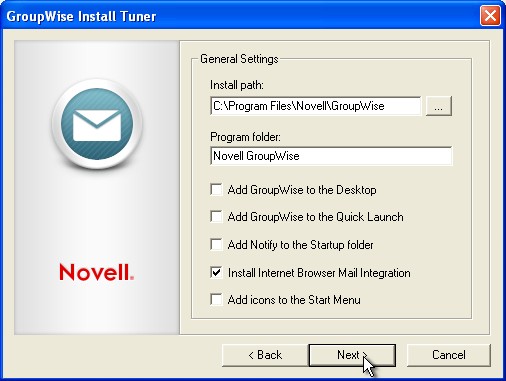
As you can probably see from figure 1, gwtuner.exe is a Windows application, and it needs access to files from the <installationfiles>\client folders. The Zenworks Control Center needs access to both the <installation files> and the <serverfiles> folders. If your GroupWise server is on Linux, this presents a bit of a complication, because you have not “installed” server files on Windows in order to extract these files. There are a couple of ways to get access to these files for our purposes. Suggestions are:
- If this is an OES server, place the <serverfiles>/agents/client directory and your <installationfiles> on a NCP accessible drive.
- Configure SAMBA for shares to the <serverfiles> and <installationfiles> and map drives from Windows to these SAMBA shares.
- Download the Windows GroupWise full distribution and extract the files by doing the following:
After downloading the full Windows distribution zip file, right-click on the file, choose “Extract All” and place it in a directory of your choice. For example c:\temp\gwinstall. This would then serve as your <installationfiles> directory for the rest of this ZCM section.
Change to this new <installationfiles>\server\win64 directory.
Run setup.exe /extract c:\temp\gwserver (or any location you choose). Use this location as your <serverfiles> location for accessing the required client files.
Our preference is actually the latter. In any event, you must have access from Windows for this process!
- Run the gwtuner.exe file.
- At this screen, enter the location of your client directory in <installationfiles> folder.
- The next screen shows the options for the installation. For our purposes, we wish to have ZCM control the client entirely, so we will go over the options here.
- In order to allow ZCM to control these options, uncheck most of the boxes in the dialog (Figure 1 illustrates this):
- Install path: Enter your installation path.
- Program folder: This is the name of the Program folder, should you choose to create one (as you will see later, we will not be creating a program folder during our setup).
- Add GroupWise to the Desktop: If you choose, you can add a GroupWise icon to the desktop during installation. For our purposes this is unchecked, as we will allow ZCM to control this
- Add GroupWise to the Quick Launch: We can also add an icon to the Quick Launch. We are leaving this unchecked.
- Add Notify to the Startup folder: We wish to control this with ZCM, so we are leaving this unchecked.
- Install Internet Browser Mail Integration: This adds “mail to” functionality to your browsers to launch GroupWise when a “mail to” link is clicked.
- Add icons to the Start Menu: If we leave this checked, the Program folder listed above will be created for the Start Menu.
- The next screen will allow you to choose the languages you wish to install. You can, of course, choose as many languages here as you require. If you choose more than one language, the next screen will prompt you for the default language for the installation.
- When you click Finish, your groupwise.mst file will be created in the win32 directory under the <installationfiles>\client\win32 folder.
Now that our groupwise.mst file has been created, we can configure the ZCM routine to deliver this client to the workstation. Novell has made some modifications to the GroupWise and ZCM settings that allow this to happen with much less work that in past versions. As we saw in the “Upgrading the GroupWise Client with SETUPIP” section in the previous article, the GroupWise client for SETUPIP is packaged in a file called setupip.fil that contains the complete GroupWise client for distribution. This is found in your <serverfiles>/agents/data/client/setup/win32 folder.
ZCM will be able to use this file, and a few other files to manage the GroupWise installation, rather than thousands of individual files as in the past. The only files we will need for our ZCM repository are setupip.fil, extract_setupip_packs.cmd and the language files we chose in the GroupWise Install Tuner. So, if we had chosen English and German as our languages to install above, we would need to also have setupip.en and setupip.de for our bundle. We will walk through those steps now.
- Launch your Zenworks Control Center in your browser, and choose Bundles.
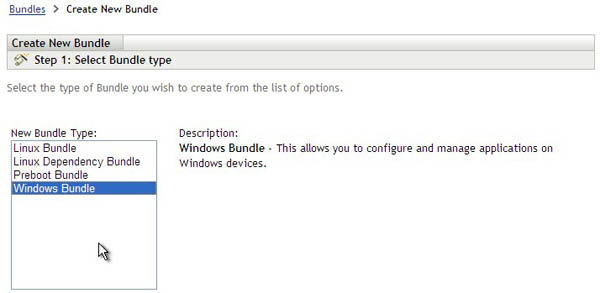
- Create a new bundle by clicking on “New” and then choosing “Bundle” and then indicating it is a Windows Bundle and click Next (Figure 2).
- Create this as an empty bundle so that we can configure the actions as necessary.
- On the next screen we will need to fill in a number of values:
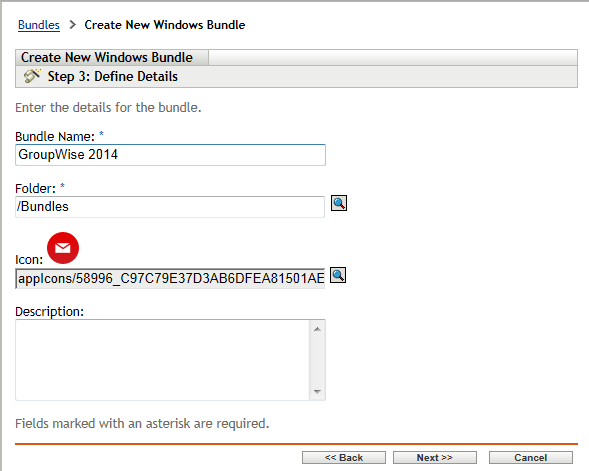
Bundle Name: Provide a name such as “GW2014”.
Folder: The default is /Bundles.
Icon: GroupWise 2014 has specified an icon for this use. Browse to your <installationfiles>/client/win32 directory and choose grpwise2014.ico as your icon file.
Description: Enter your description for GroupWise 2014 Client here. (Figure 3)
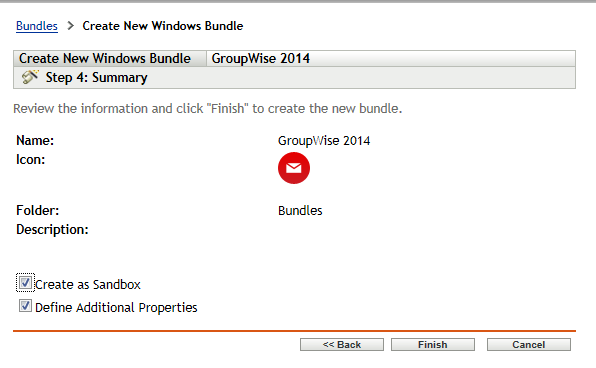
- On the next screen ZCM 11 will allow you to create your bundle as a “Sandbox” version if you choose to do so until you are ready to publish the bundle for installation. Leave “Define Additional Properties” checked here so that we can further customise the application. (Figure 4).
Next we will create some installation actions for our bundle:
- Click on the Actions Tab, and then the Install tab to create some new actions.
- For the first Action, choose a Prompt User action. For this action we will use the following values:
Name the action something such as “Prompt User that the Client will be installed”.
User Cancels Allowed: If you wish to force the installation immediately, leave this at 0.
Seconds to be Displayed: Choose how long the prompt should stay on the screen - perhaps 30 seconds.
Click “Add” in the Define Prompts box to type in the text to be displayed. For example “The GroupWise Client will now be installed. Please be patient”.
Scroll down and select OK to save the action
We’ll now create a second action:
- Now, choose “Install File(s)” as a second action. In this action we are essentially having ZCM put the installation files in a temporary location on the workstation so that the extract_setupip_packs.cmd can perform the extraction. Name this action something that will make sense to you. For example “Install files to temporary installation folder”.
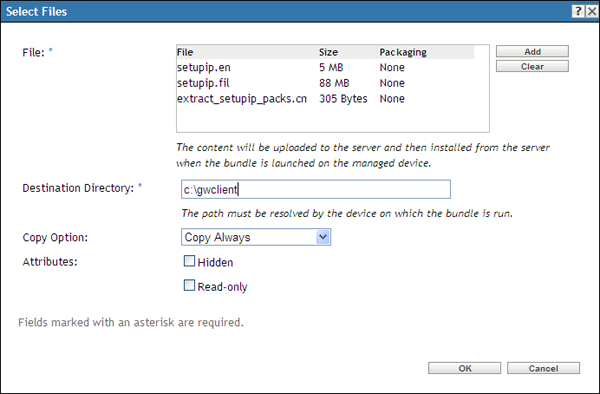
Click on Add to get to the Select Files dialog, and click Add again to find the files. This time we need to go to the <serverfiles>\agents\data\client\setup\win32 folder and select the extract_setupip_packs.cmd, setupip.fil, and our language files (for example, setupip.en and setupip.de). Click “Open” to include these files in the Select Files dialog.
The setupip.fil file is already a compressed file, so it not necessary to compress these files further. Thus, check the box that says “do not compress or encrypt uploaded content”.
When you click Ok, you will see a confirmation screen to show you the files that will be uploaded to your repository.
- Once the files are uploaded, you will be returned to the Select Files dialog. Now you will need to specify where these files should be placed on the local machine (see figure 5). Remember this is a temporary installation directory, so you can choose any location you like. An example would be c:\gwclient. Select Ok.
- At the next screen, you can select to run this installation as a dynamic administrator user to avoid any rights problems during the copy. Click ok to save this action.
The next action we need to create is one to extract the files from the setupip.fil file for GroupWise.
- Back on the Install Tab, click Add to create a new action, and choose Run Script as the action.
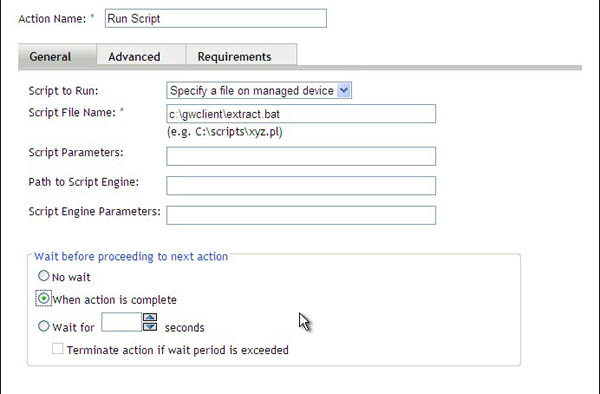
- In our first action, we copied extract_setupip_files.cmd to c:\gwclient, so we can enter c:\gwclient\extract_setupip_packs.cmd as the Script File Name. The extract_setupip_packs.cmd file will then extract all of the files under this directory into c:\gwclient\win32. This is important for our final installation step.
- Click the radio button next to When Action is Complete for the wait parameter for this script. (Figure 6).
- Before you leave this screen, you should give the Action Name a more specific name, such as “Run Script to extract GW2014 files”.
- Choose to run the script as dynamic administrator to avoid problems during the extraction.
- Click OK and you will now see two actions in your Install tab.
The next step is to copy the MST file that we created with the GroupWise Install Tuner to the local temporary installation directory. The following steps will do this:
- Click Add again to create a new action. Choose “Install File(s)”, and give the action a name that designates that you wish to “Copy groupwise.mst to local directory”.
- Click Add to show the Select Files screen, and click Add again to show the add dialog.
- Browse to your <installationfiles>/client/win32 directory and choose the groupwise.mst file that we created above. Click OK. The file will be uploaded to the ZCM repository.
- Next you will be asked where this file should be copied. The extract_setupip_packs. cmd process created c:\gwclient\win32 (if you used c:\gwclient as your temp directory). This is where the groupwise.mst file must reside.
- Leave the copy option as Copy Always.
- Change to the Requirements tab and run the process as Dynamic Administrator.
Our final action will be to actually install GroupWise using the groupwise.mst file.
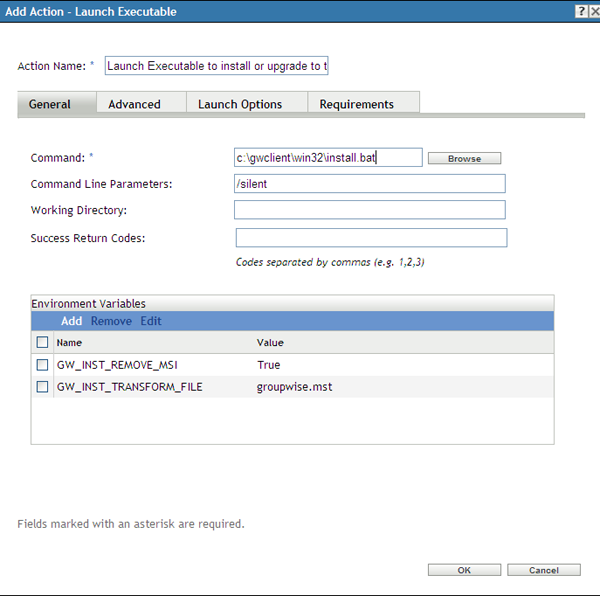
- Again, at the Install Tab, add a new action of “Launch Executable”. Name this Action “Launch install.bat for GroupWise 2014” (Figure 7).
- The command name in our case will be c:\gwclient\win32\install.bat.
- For command line parameters you can choose:
/unattended - this will show the typical GroupWise progress status for the installation
/silent - the user will not see anything while GroupWise installs. - Click on Add under Environment Variables and add the following:
Name: GW_INST_TRANSFORM_FILE
Value: groupwise.mst - note that this assumes the same folder as the install.bat file, which in our case is correct. Click Ok. - Click on Add under Environment Variables for a second variable to update existing GroupWise installations to match our current installation msi:
Name: GW_INST_REMOVE_MSI
Value: True. Click OK - Next click on the Advanced tab and select “When action is complete” for the wait time. Also choose to run as dynamic administrator. Click OK.
Next we will create a launch action for the GroupWise 2014 bundle.
- Click on the Launch Tab, then click on the Add button and choose “Launch Executable” as the type.
- For the command, you will have “${ProgramFiles32}\Novell\Groupwise\grpwise. exe”.
- For command line parameters you can choose any parameters you typically use.
- Click on the Advance Tab. Since this is for the launch of the client, you should choose “no wait” and “Run as logged in user”. Click OK.
- Apply your changes.
Back at the script parameters for the installation, we had the choice of running the installation in unattended or silent mode. If you chose silent, you might wish to allow ZCM to control the dialog that users see. To do so, go back to the Summary page of your new bundle, and scroll down until you see “Show Bundle Activity”. If you change this to “Yes”, ZCM will provide the status information to the user as the application installs (See figure 8).
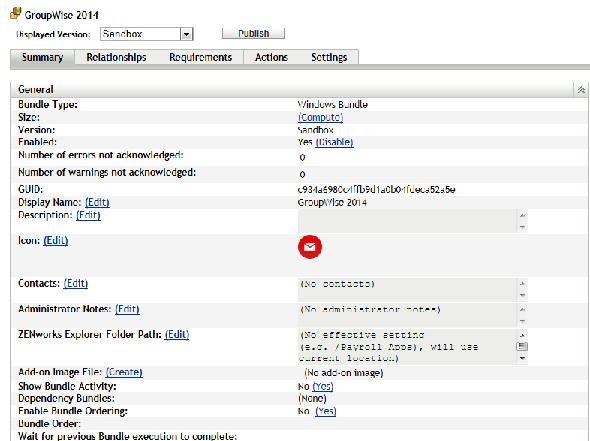
Next, change the “Displayed Version” at the top of the Summary from Sandbox to Published. To do so, click on the “Publish” button, publish as a new version.
To complete your installation, add your relationships, requirements, icon choices and schedule.
Auditing the GroupWise Client Upgrade
The GroupWise 2014 POA has a feature that can give you a quick look at who has upgraded to GroupWise 2014. In order to see this feature your GroupWise 2014 POA should support HTTP monitoring and your post office must have enabled the setting for tracking a minimum client version.
You can either enable HTTP monitoring in the Administration Console or in the startup file of the POA. The advantage of using the Administration Console to apply these settings is that the POA will pick up the settings dynamically, and you will not need to restart the post office agent.
The minimum client version settings will highlight in red the version number or release date of the GroupWise client for any user who is using a client older than the version or date you indicate.
Below is how you can enable these settings through the Administration Console:
- Click on Post Offices
- Click on the Post Office you wish to monitor
- Click on the Client Settings tab
- Enter the version you would like for your Minimum Client Release Version (14.0 would represent the GroupWise 2014 client).
- Make sure you do not check the box next to the Minimum Client Release or only your GroupWise 2014 users will be able to log in.
- Click Apply, then OK to exit.
Please note that if you check the check box to Lock Out Older GroupWise Clients then users will get a message before even entering their GroupWise password that states “The version of GroupWise you are using is older than the minimum version allowed by the system administrator.” You need to be careful about enabling the lock out function, as the user will not even be given the opportunity to update their client if you select this option. You may be better off using the grace login option in the Client Options to give the user X number of grace logins before they are able to login without updating.
After enabling these settings you can monitor the client versions from your browser. Go to the POA’s http port in this manner from your browser:
http://192.168.100.238:7181
If you are not sure what HTTP port your POA is using, you can hit the C/S port (1677) and it will redirect you to the HTTP Port.
You may be prompted for the User Name and Password for the POA HTTP Monitor. Once you have loaded the Web monitor for the POA, click on the C/S Users link. From here you can view the version of GroupWise client that your various users are using. Any user that is using an older GroupWise client than you specified will show up in red. Any user that is using at least the GroupWise client version you have specified will show up in blue.
Hopefully this article will get you on your way to finishing up your GroupWise upgrade. Good luck!
This article was first published in OHM Issue 34, 2016/3, p29-33.


