The Micro Focus Identity Manager Advanced Edition is delivered with a reporting engine containing approximately forty predefined reports. If you’ve ever had the time to install and configure it you know about the complexity of this module. SKyPRO’s new IDM Audit and Compliance Dashboard v2.0 offers, with its report wizard and report editor, a much easier approach to building your own compliance reports.
 Some basic theory
How does the Audit Compliance Dashboard work? The basis of the report engine are two services, that gather all their data from eDirectory. First there is the audit driver that listens to all events relating to objects and attributes, that should be monitored.
By default, it records all events on users, organisational person, groups, organisational units, roles, resources, locality and devices into an Elasticsearch engine which is based on the Lucene indexing and search library. The filter of the driver can be extended on the fly to monitor more objects or attributes. Since Elasticsearch is based on schema-free JSON documents there are no modifications required to the Lucene library.
Secondly the IDM Audit & Compliance Dashboard comes with a service that is able to take snapshots of your eDirectory on a regularly base. You decide by yourself whether you want to take these snapshots every hour, daily, weekly or monthly. These snapshots are also stored in the Lucene library.
Again, because Lucene is based on schema-free JSON documents, it doesn’t matter which complex eDirectory schema extensions your tree may have, all directory data will be saved in its entirety.
The report wizard
Now let’s start with the reporting module. Of course we also deliver some default reports about users, groups and roles but the strength of the reporting module is our integrated report wizard and editor.
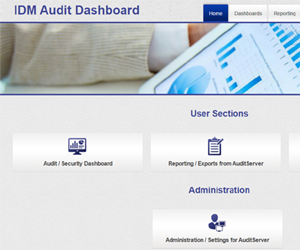
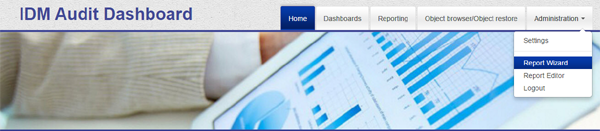
The report wizard allows you to build your very own customised reports in four easy steps. Just click the Administration tab and select Report Wizard as shown in figure 1, The IDM Dashboard home page.
Step 1: Name the report and choose the template.
Name the report and choose, whether you want to create an audit report or a standard object report. An audit report generates a report about all the modifications that have been monitored by the audit driver during a specific period.
The standard object report allows you to build reports on any object class that has been snapshotted.
For example create a basic user-role report, that shows all directly assigned and inherited roles a user had at a specific date. We name it “Basic User-report” and select Standard report (angular) from the drop-down box.
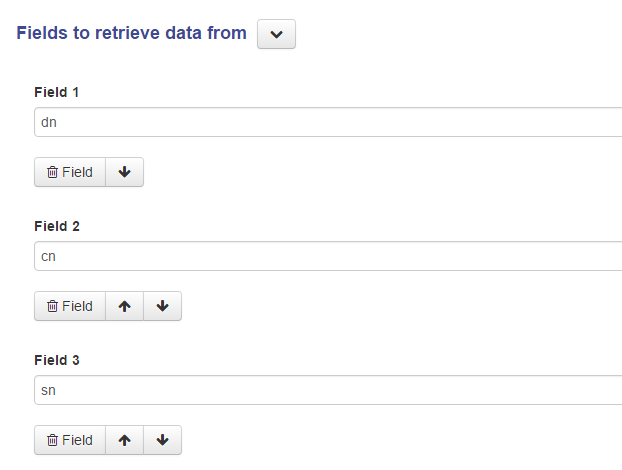
Step 2: Define the fields you want to see on the report. (Figure 2).
At this point you can define all the attributes you want to place in your report. You can search by LDAP attribute names and label them on your report as you like. In this example add the following attributes to the report:
LDAP Attribute Display name
sn Lastname
givenName Firstname
ou Department
mail Email
telephoneNumber Phone
nrfAssignedRoles Assigned Roles
nrfInheritedRoles Inherited Roles
When you’ve finished just press the Next button.
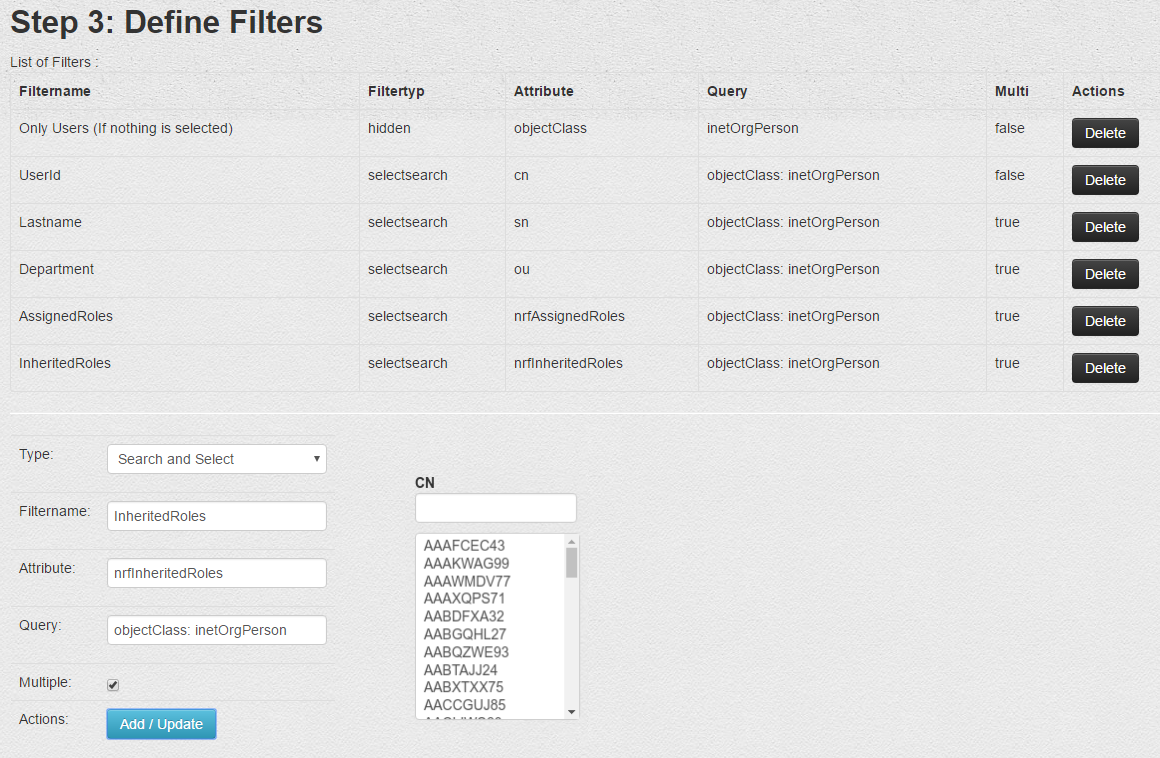
Step 3: Define the filter you want to apply on your data.
Next define the filters applicable to select specific user objects. There are various types of filter.
- Standard - A box appears containing all values that have been found for this specific attribute. Select the attribute values for which you want to apply the filter.
- Search and Select - A search box appears above all values that have been found in this specific attribute. You can either select the values or search for the values for which you want to apply the filter.
- Search - Specify a specific search string for the filter.
- Static/Hidden - Same as “Search” but the filter will not appear when you start the report
To make complicated things easy in this example just define a Search and Select filter for the cn, lastname, department, assigned roles and inherited roles. Then delete the filter on attribute DN.
Now select filtertype Search and Select, enter the filtername (e.g. UserID) and attribute (e.g. CN and press Add/Update for every filter. Enable the Multiple checkbox for the filter on Lastname, Department, AssignedRoles and Inherited Roles.
Step 4: Save the report
Just click on Save and you’ve completed designing the report. Congratulations!
Run the report
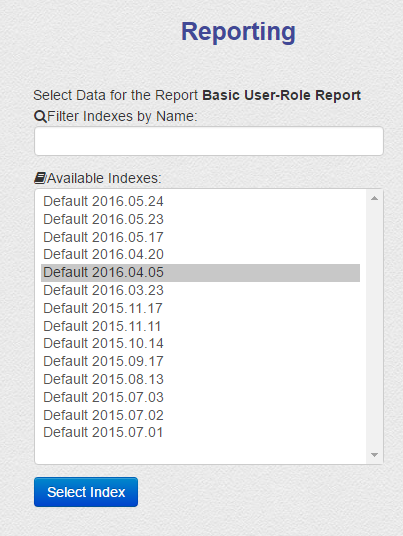
Now it’s time to run the report and have a look at what we have built with the report wizard. Click on the Reporting tab from the main dashboard screen (see figure 1) and you’ll see the newly created report along with all the default reports.
Select the “Basic User-Role Report” we have created. The next window you see is the selection of all the available eDirectory snapshots. Depending on the schedule you have defined you may have an hourly, daily or weekly snapshot you can select the data from. (Figure 3).
Next all the defined filters will appear. With the help of these filters we can query the data to reduce the quantity of data in the report and to narrow the report to what we really want to see.
According to our filter definitions we can query on CN, lastname, department, email, assigned and inherited roles. Again keep it simple and just select the department “Information Technology”. (Figure 4).
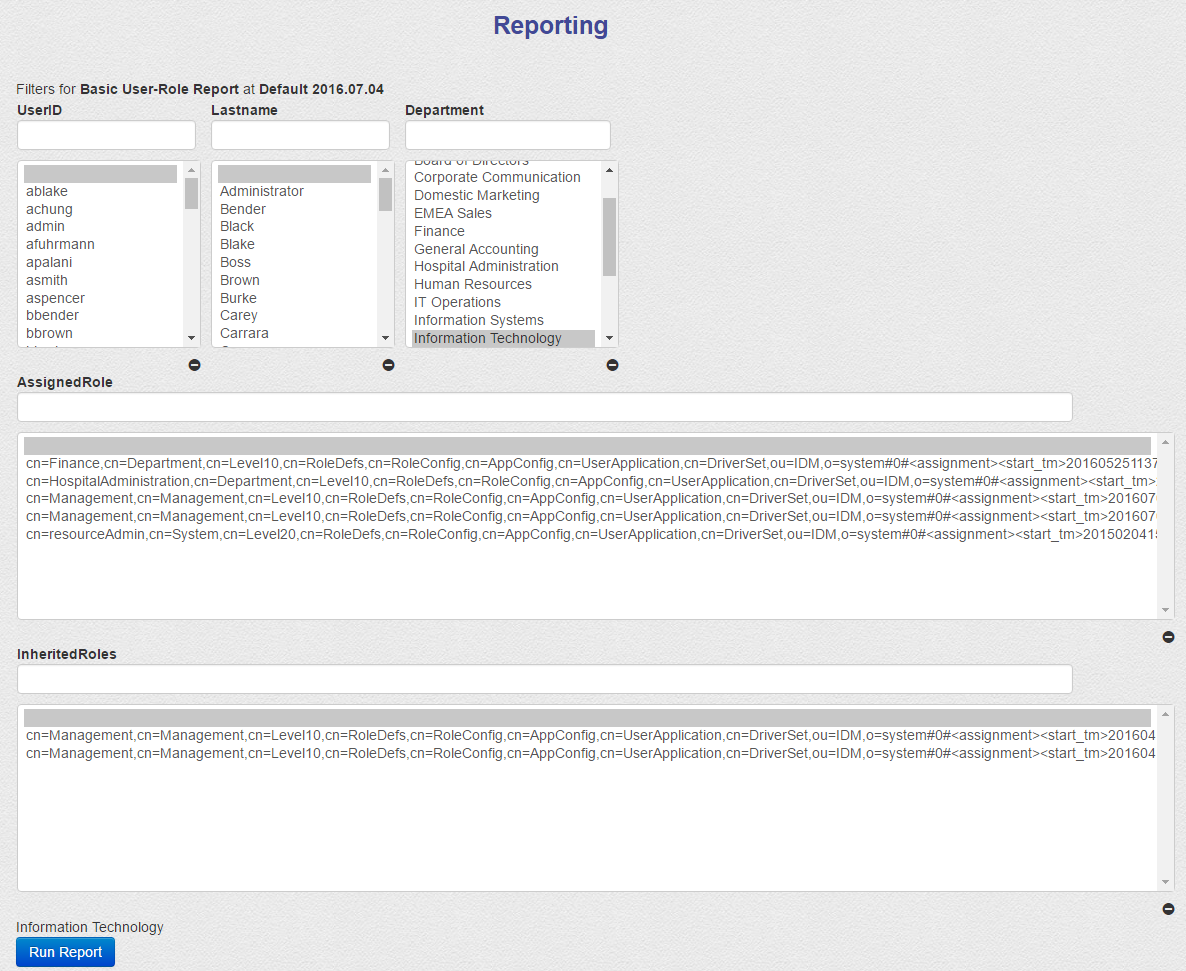
Using this filter reveals all users who work in this department and the report displays the attributes selected in our report definition; DN, CN, Lastname, Firstname, Department, Email, Phone, assigned and inherited Roles (see figure 5). To make the report compliant you see the source of the data in the header as well as all the selection criteria.
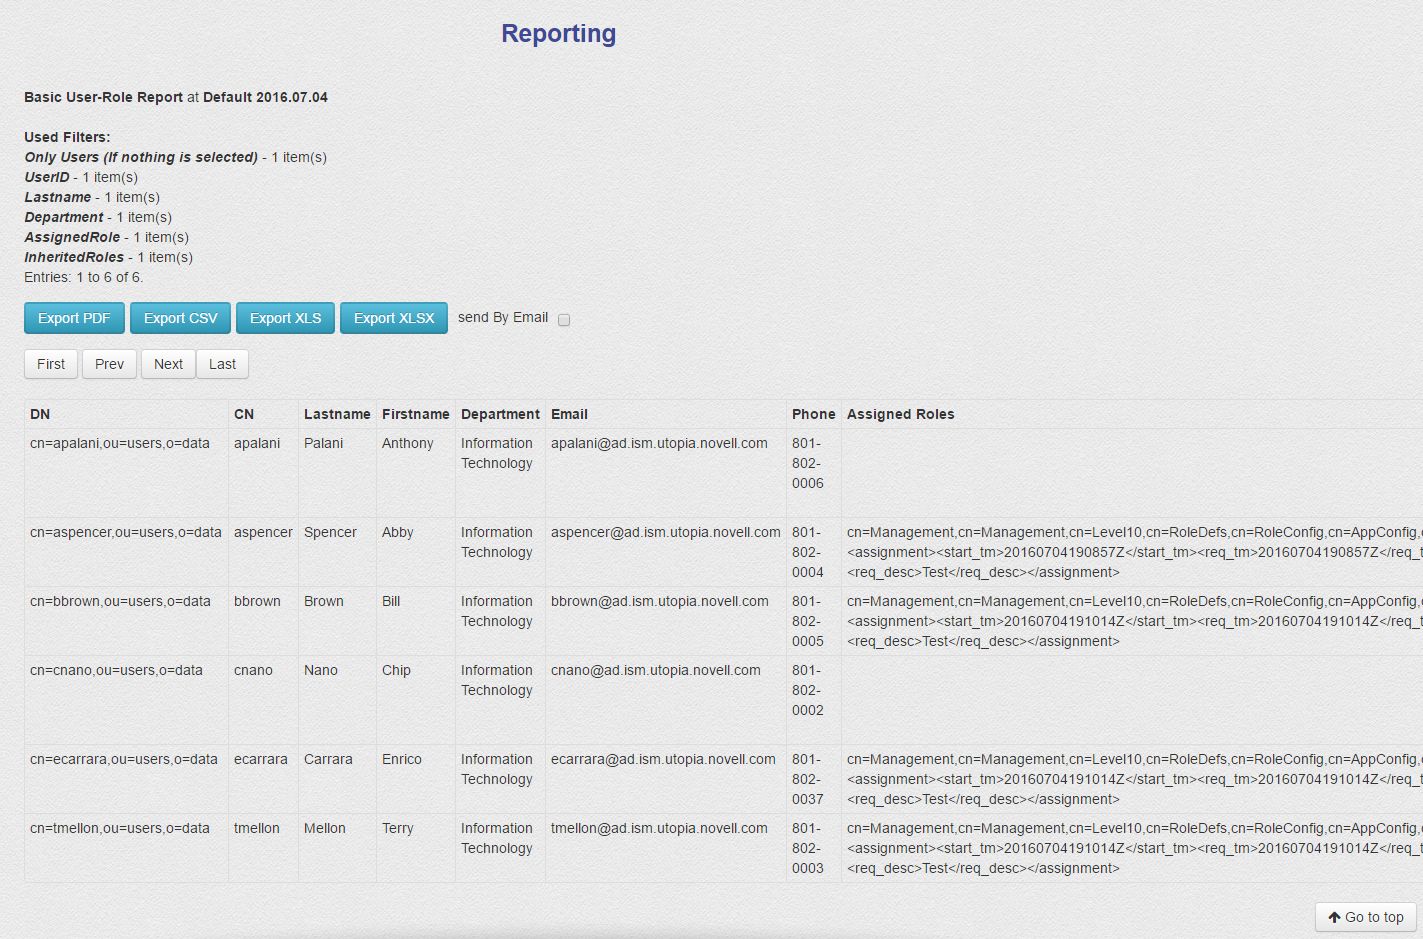
If you wish to delve further into this data you can export it as a CSV or XLSX file or if you want to send the report to somebody just export the report as a PDF file.
Sometimes these reports get very bulky and it will take some time to generate and export them. If this is the case, you can configure the report engine to send the report by email as soon as it is ready.
Edit the report
Of course you can edit the report you’ve created with the report wizard at any time and modify everything we have defined so far.
You can add more functionality to the report and completely customise the look and feel. It is beyond the scope of this article to explain all the possibilities available to modify an existing report, but a short summary will give you an impression about the flexibility of our report editor (figures 6 and 7).

To edit the report, select the Administration tab and click Report Editor (see figure 1). In the drop-down box look for the “Basic User-Role Report”. From here you can modify your report to all your specific requirements.
For now here is a short summary about the different settings.
- General settings - In the general settings we define the name of the report, how many lines should be displayed on the screen per page, how the names of the snapshot files should appear, the general sorting field and sort direction. (Figure 6).
- Data fields - In this section you can change the data fields and the sequence of the data fields, that should be retrieved and displayed. (Figure 7).
- Field Aliases - You may want to change the cryptic LDAP field names to human readable field labels to be shown as column headers.
- Filter definition - This is one of the most powerful features. In this section you can add, modify or delete your filter definitions. This way you can reduce the amount of data to retrieve and narrow the search results precisely to the data you’re looking for by defining unique values or unique keys, for lookups to other objects and attributes
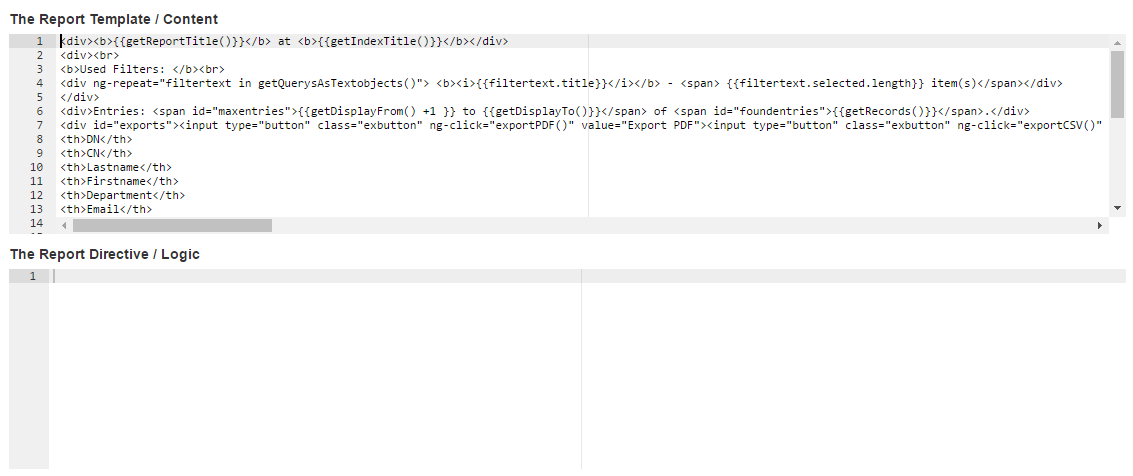
- Report template content - This is the section for power users. Here you have the HTML source, that is used to generate the report. Whatever you wish to modify to the look & feel of your report, this is the place to do it. (Figure 8).
- Report directives and logic - If you have special dynamic content you may want to add to your report or even add some charts or other graphics to your report, this is the place to do this.
- List definition - Do you need any specific lists or tables to look up for your report, that are not in the lucene index? You can add these lists here and show meaningful text instead of some cryptic codes.
- Predefined queries - In case you want to build a report without filters, that allow users to do some selections on the data, you can specify predefined filters, that are applied to the data. The report will be built directly without further user intervention.
- Filter template definitions - A template exists for every predefined filter type on how to display and handle this specific filter. If you want to change the look & feel of predefined filter types or even want to add your own filter types, you can do this here.
Spotlight on Identity Manager
This short article indicates the power and simplicity of using the SKyPRO IDM Audit and Compliance Reporting Dashboards to organise and reveal the data that is held in your Identity Management system.
As mentioned it’s based on successful open source components and can be modified to your specific requirements. For further information please go to http://www.skypro.ch/en/products/idm-supplements/idm-audit.
This article was first published in OHM Issue 34, 2016/3, p14-17