One of the amazing new features of SLES 12 is the ability to roll back changes made by YaST or zypper – even a full rollback is possible in the event of a kernel patch gone wrong. So, how does it work, and what do you need to do to enable this system-saving functionality? The answer to that question is: absolutely nothing! If you perform a default installation of SLES 12 then this functionality is already enabled by default, right from taking the snapshots to booting from one in an emergency.
The one prerequisite is the use of the new filesystem on the block – Btrfs, pronounced Butter FS or Better FS; you choose. I prefer Butter FS because butter comes from cow’s milk and Btrfs is a CoW (Copy on Write) filesystem! OK, enough of the bad puns. Time to examine Btrfs in a bit more detail to see what it does for us, and then on to Snapper – the utility that drives the Btrfs snapshots.
What’s this new-fangled Btrfs thing?
Btrfs is the new default root filesystem in SLES 12. While it’s probably new to most people, it has actually been available for some time in SLES 11, but the supporting toolset wasn’t there. New filesystems are always a little bit scary, and it takes a while for trust to build up – keeping one’s data safe is generally regarded as a good thing! This move away from the EXT line of filesystems has been in the offing for a while. Even in SLES 11, XFS was recommended for large filesystems rather than EXT3.
Without going into detail or trying to start a holy war, the filesystem recommendations from SUSE for SLES 12 are as follows: for root use Btrfs, for data filesystems use XFS, unless you need the snapshot functionality in those data filesystems, in which case it’s Btrfs.
“...for root use Btrfs, for data filesystems use XFS...”
There are certain workloads that you definitely should not put on Btrfs. For example anything that involves a lot of in place updates to large files (underlying files for virtual machine hard disks, databases etc). All CoW filesystems are bad at this kind of workload, so don’t blame Btrfs. You’ll understand why before much longer, but take my word for it for now! XFS is significantly more scaleable and robust than EXT3, so please look into at it for any decent size filesystem (500G+).
Btrfs from an altitude of 10,000m
I could fill this whole issue telling you about the amazing range of features in Btrfs, but I’ve been told to keep it short this time, so I’ll concentrate on just three: copy on write (CoW), subvolumes and snapshots.
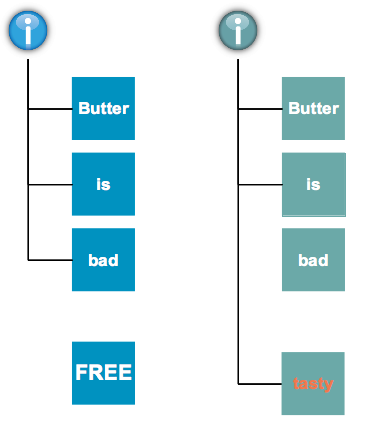
We all know that filesystem journaling is good thing, it keeps our data safe. Well, Btrfs doesn’t use journaling! Instead it uses copy on write, which, as the name suggests, makes a copy of a block and writes the changes to that copy, thereby preserving the original block as shown in figure 1.
Data integrity is assured because the original block is preserved until the new block has been written to and the inode updated. The original block may well be kept around for a while before it’s put back into the free space list. We’ll see why that happens later on. This CoW method for updating files does of course have a couple of downsides.
Firstly it requires more IO than a traditional update – the block has to be copied and then updated. Secondly, it can lead to fragmentation in the filesystem – what was a nicely contiguous file now has one block somewhere else in the filesystem.
Btrfs supports online defragmentation to remedy this situation, but if you’re only using this as your root filesystem with your data elsewhere then it shouldn’t be too much of an issue anyway. CoW does however form the basis of the killer feature of Btrfs: in-filesystem snapshots.
Snapshots in Btrfs
The ability to take snapshots within Btrfs is probably its crowning glory. Remember the diagram above? The block containing the word bad is no longer used by the file but it’s still hanging around. Well, that’s because it’s used by a snapshot. A snapshot is exactly what you would expect – a point in time view of the filesystem. A snapshot containing the old version of our file will still point to the block containing the word bad.
Indeed it’s possible to navigate around the Btrfs root filesystem and actually view both versions of the file! Snapshots work by taking a copy of the file allocation map (a B-tree if you’re interested). This copy is effectively a valid filesystem in itself and can be mounted! Interestingly, this B-tree copy is itself done using CoW to save space.
You might be wondering exactly what’s contained in a snapshot? Well, that’s a good question. If you use the mount command on a system using Btrfs you’ll see something like what’s shown in figure 2 below.
|
linux-ch58:~ # mount | grep btrfs /dev/sda2 on / type btrfs (rw,relatime,space_cache) /dev/sda2 on /.snapshots type btrfs (rw,relatime,space_cache) /dev/sda2 on /var/tmp type btrfs (rw,relatime,space_cache) /dev/sda2 on /var/opt type btrfs (rw,relatime,space_cache) /dev/sda2 on /var/lib/pgsql type btrfs (rw,relatime,space_cache) /dev/sda2 on /var/lib/named type btrfs (rw,relatime,space_cache) /dev/sda2 on /var/log type btrfs (rw,relatime,space_cache) /dev/sda2 on /var/lib/mailman type btrfs (rw,relatime,space_cache) /dev/sda2 on /var/crash type btrfs (rw,relatime,space_cache) /dev/sda2 on /usr/local type btrfs (rw,relatime,space_cache) /dev/sda2 on /tmp type btrfs (rw,relatime,space_cache) /dev/sda2 on /srv type btrfs (rw,relatime,space_cache) /dev/sda2 on /boot/grub2/x86_64-efi type btrfs (rw,relatime,space_cache) /dev/sda2 on /boot/grub2/i386-pc type btrfs (rw,relatime,space_cache) /dev/sda2 on /var/spool type btrfs (rw,relatime,space_cache) /dev/sda2 on /opt type btrfs (rw,relatime,space_cache) /dev/sda2 on /home type btrfs (rw,relatime,space_cache) Figure 2: Ouptut from the mount command for a btrfs file system |
“Btrfs has the idea of subvolumes “
Your eyes are not deceiving you; it really does look like the root filesystem (/dev/sda2) is mounted multiple times. Of course it’s not, well not quite.
What’s actually happening is that Btrfs has the idea of subvolumes – a separate B-tree within the filesystem that acts much like a separate filesystem.
These subvolumes are mounted in much the same way as a separate partition would be, and that’s what you’re seeing. The point of subvolumes is that snapshots only work on a given subvolume, not the whole Btrfs filesystem.
So, if you take a snapshot of your root filesystem you’re actually taking a snapshot of the root subvolume, and not /var/tmp, /var/opt etc. The point of this is that if you roll back your root filesystem, you don’t roll back the log files, databases etc.
If this all sounds a bit weird, my advice is just to go with the flow and use Btrfs, if it’s piqued your curiosity then there’s plenty more information out there.
Working with snapshots
Now that we know how snapshots work, we need to know how to use them. It turns out to be very simple: just administer SLES 12 using the tools provided! YaST and zypper create snapshots whenever you use them, and there’s a tool called snapper that lets you manage those auto-created snapshots and take some of your own as well.
Whenever you start a YaST module, it takes a snapshot to preserve the state of the filesystem. The module then makes the changes requested by the administrator, and finally takes a second snapshot as it’s closed. These are linked into a pre/post pair which easily allows you to see what YaST has been up to. You can view these snapshots using the snapper command line tool, or the Snapshots module in YaST. Figure 3 shows what the YaST module looks like.
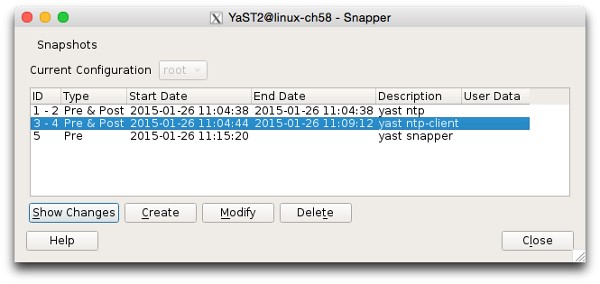
As you can see there are five snapshots on this system, with the highlighted pair (3-4) created by the YaST ntp-client module. You can view the details of what happened between those two snapshots by clicking the Show Changes button (figure 4).
I’ve navigated through the file hierarchy in the left pane to select /etc/ntp.conf. At the right I’ve chosen Show the difference between the first and second snapshot. The file content section shows the changes, in diff format, to the selected file.
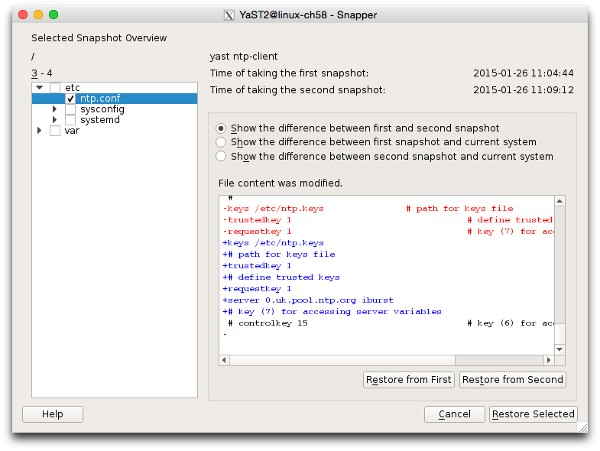
From this window it’s also possible to revert the file to either version by clicking “Restore from First” or “Restore from Second”.
If you decide that you don’t want to use YaST for an administration task, you can take manual snapshots using the snapper command line utility. You can even create pairs in the same way that YaST does, and you can put in meaningful descriptions for your own snapshots.
“Don’t run out of space by keeping snapshots forever!”
Snapshots do take up space within the partition, and they will grow over time as the live filesystem is changed, just like all snapshots. Snapshots will hang around for a while until snapper’s garbage collection rules kick in to reclaim space by deleting the oldest.
You can influence this behaviour by adjusting snapper’s rules, but you want to ensure that you don’t run out of space by keeping snapshots forever!
System rollback
Now that you know how to find and restore individual from Btrfs snapshots, what about the case where you apply a kernel patch and reboot, only to find that the new kernel didn’t install properly, or the updated RAID driver no longer finds your filesystems?
Well, thankfully, zypper behaves the same way as YaST – it takes a pre-post snapshot pair when you patch. Of course if your system won’t boot properly, how do you access these snapshots to do a rollback? This is where GRUB2 appears over the horizon on its white charger.
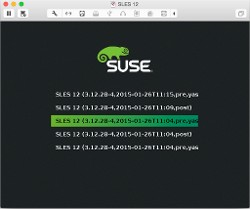
If you look carefully at the boot menu you’ll see a new option at the bottom as shown in figure 5.
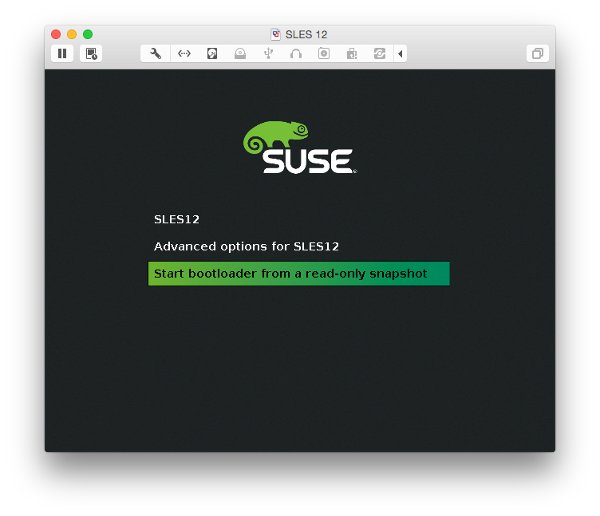
GRUB2 is fully aware of your Btrfs filesystem, and the snapshots that it contains. It’s able to use any snapshot of your root subvolume to boot from. All you need to do is to select the highlighted menu option. This brings up a further menu showing all the snapshots that it can boot from (figure 6).
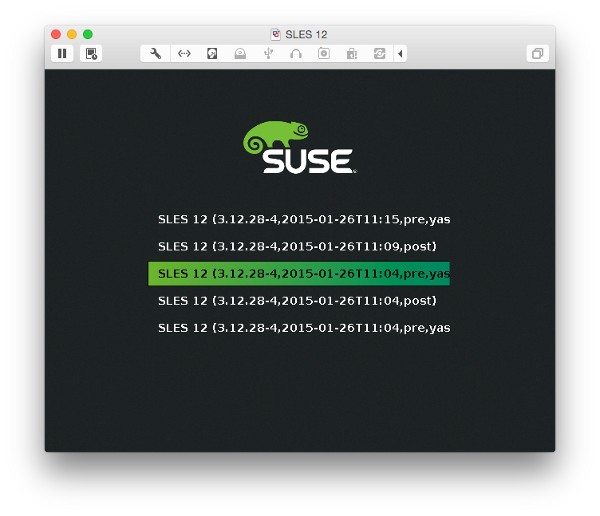
Select a snapshot and GRUB2 will boot from it after 8 seconds if you don’t touch the keyboard. A word of warning though, the snapshot is read-only. The system won’t start up fully, you’ll probably be presented with a console login.
Go ahead and log in, have a poke around to make sure everything is ok. If so, run and tell snapper that you’d like to commit this rollback using snapper rollback (figure 7). It will wave its magic wand and once it’s finished, just reboot and you’ll find the bad stuff never happened.

Once the reboot is complete you can then do your Sherlock Holmes impression to find out what went wrong, but you have all the time in the world because your server is up and running as if nothing happened!
“There’s a lot to learn about Btrfs and snapper “
So, hopefully you can now see that the relative complexity of Btrfs and its subvolumes is worth it.
There’s a lot to learn about Btrfs and snapper, but I hope I’ve done enough to persuade you to give it a try!
(This article was first published in OHM28, 1-2015, p21-24.