by Paul Lamontagne and Danita Zanre
For a new GroupWise Administrator, the prospect of upgrading the GroupWise system can be a bit daunting. Of course, even those of us who have done hundreds of upgrades run into issues occasionally. GroupWise 2014 introduced an entirely new “wizard” for upgrading. While most of you know that we are not fans of wizards (except at Hogwarts) we will use this wizard for our upgrades. It is the planning that is of the utmost importance during any software deployment. Even with the simplest of upgrades planning is critical for success. This article is based on upgrading to the forthcoming GroupWise 2014 R2 release.
Preparing your GroupWise System
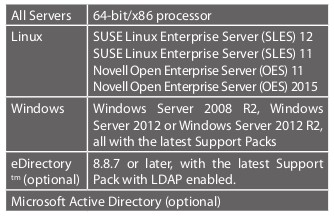
Memory and disk space requirements are not substantially different than prior GroupWise server requirements. The most notable change is that a 64 Bit OS is now required.
So, regardless of the other hardware specs of your servers, if you are still running a 32 bit OS you will need to migrate your data from your current server to a 64 bit OS. Server requirements are listed in the table below.
Administration Requirements
ConsoleOne is not supported foy GroupWise 2014 Administration. However, as long as you have a mixed environment, you will need to keep ConsoleOne around for some administration of domains older than GroupWise 2014.
Novell cautions against using ConsoleOne with GroupWise snapins against a GroupWise 2014 domain. That said, you will need to keep ConsoleOne with GroupWise snapins for managing Document Management Properties.
While there are many supported browsers for the Administration console, in our opinion you will get the best results using Firefox. We have tested Chrome and IE11 with no issues but Safari on Mac is problematic.
There are some command line utilities needed for administration. On Linux it is best if these are run as root.
WebAccess/Monitor Application/Calendar Publishing Host Requirements
While GroupWise specific agents require a 64 Bit processor, the Web based services such as WebAccess, Monitor Application and the Calendar Publishing Host can be run on a 32 bit web server - specification as in the table below.
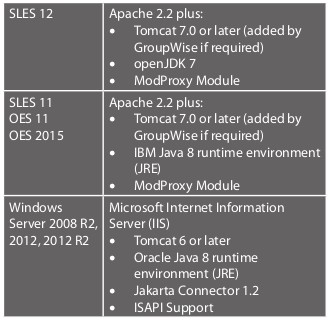
Have your Linux repository available when you begin your install, if required files are missing during the installation, they will be installed as needed.
You must manually install IIS with ISAPI support prior to GroupWise 2014 WebAccess installation. All other items above will be installed by the GroupWise installation routine if necessary.
Software Distribution Directory
The Software Distribution Directory is no longer required. If you never used it, you will be able to remove it from your servers. For those of you who used it you will still be able to perform auto-updates. The procedure has simply changed. We will discuss client upgrades in a future article.
WebAccess Changes
If you are upgrading from a system older than GroupWise 2012, you will need to understand some changes. Prior to GroupWise 2012, WebAccess consisted of 2 components- The WebAccess Agent and the WebAccess Application. GroupWise 8 and earlier used the WebAccess Agent to communicate with the Post Office Agent (POA).
In GroupWise 2012 and newer the WebAccess Application communicates directly to the POA via the SOAP protocol. This may require you to leave an older version of GroupWise WebAccess until you are able to upgrade all of your Post Offices to GroupWise 2014.
There are settings available in the GroupWise 2014 WebAccess Application that allow it to serve as the default WebAccess entry point into your system and then redirect older users to the appropriate web server hosting the GroupWise WebAccess application for your current GroupWise version.
Document Management Considerations
GroupWise document Management still works in GroupWise 2014. You can create new Libraries, manage all of the rights and run Library maintenance through the GroupWise Administration Console.
However, the GroupWise Administration console has no facility to edit document Properties For GroupWise Libraries. There is also no facility for this in ConsoleOne on Linux either. In order to edit the Properties, you must run gwdpmb32.exe on Windows. This is found in the c:\novell\consoleone\1.2\bin directory on a machine with ConsoleOne and the GroupWise snapins installed.
There is no requirement to be logged into eDirectory, but it DOES have some DLL dependencies provided by the Novell client installation. So, it must be run from a machine with a Novell Client installed.
Preparing your LDAP System
GroupWise 2014 has a new “directory” option. GroupWise 2014 can still use eDirectory, but can now also use Microsoft/Active Directory, or a standalone directory integrated with your Domain database. If you plan to continue to use eDirectory, you should verify your GroupWise system is configured properly for LDAP synchronisation.
This is not the same as LDAP Authentication (LDAP Authentication provides some of the pieces for LDAP Synchronisation). LDAP synchronisation is the mechanism that keeps the GroupWise address book synchronised with changes made in eDirectory or permits the publishing of users’ -mail addresses back to the directory.
By default, MTA eDirectory sync is not enabled with GroupWise 2014 or prior. eDirectory MTA Sync was only needed in the case of modifying eDirectory address book attributes outside of the GroupWise enabled ConsoleOne.
If an administrator used iManager or a 3rd Party utility that was not GroupWise aware, the changes would not be synchronised to the GroupWise system. With the MTA eDirectory Sync configured, any changes would be synchronized on a daily schedule.
Installing the GroupWise Administration Service
The GroupWise Administration Service (referred to during the install as the GroupWise Server) is a new process that runs on each GroupWise server that houses agents. Installing the Administration Server is the first thing that you must do on any server as you work through your upgrade.
This process can only be completed just prior to performing your upgrade. Once you begin installing the Administration Service, files will be changed on your server that will require you to continue your upgrade immediately after installing the Administration Service.
Download the Installation media
We will discuss the upgrade procedure on a Linux server. The first thing you need to do is download the GroupWise installation media. This could be through http://download.novell.com or through your Customer Care Portal. Copy the compressed files to the location of your GroupWise Server and extract them. Once extracted from the command prompt launch the installer by typing ./install.sh.
Install the GroupWise Server
Notice that the installer is no longer graphical. Everything is now text based. Use the arrows or tab key to navigate.
- At the Command Line type ./install.sh
- Select your language and then select Ok
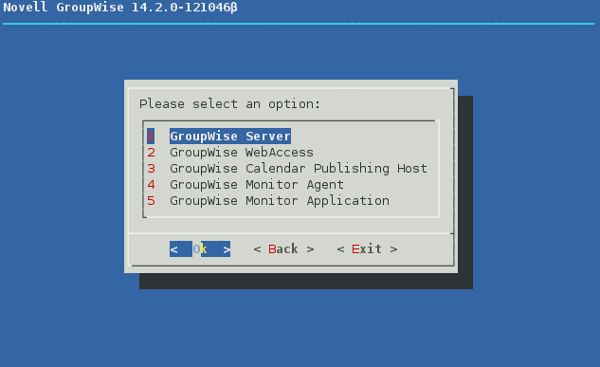
- You will be presented with the EULA. Agree to it and you will be presented with the components screen (see figure 1)
- Select GroupWise Server
- You will now have two choices, Documentation and Installation. Documentation will attempt to open a browser and access the GroupWise online documentation. Select Installation.
- We now have the choice of Install or Configure. Chose Install.
The installation routine will immediately shut down all the agents that are configured on this server. It will remove any unsupported files on the server, this includes the GroupWise 8 client for Linux as well as ConsoleOne snapins for GroupWise.
After the agents are shut down, the installation will attempt to connect to nu.novell.com to look for any new versions of OpenMotif. Once connected to nu.novell.com GroupWise will install all of the required GroupWise files.
During this process, the installation also creates a GroupWise Certificate Authority, and creates certificates for the GroupWise Administration Service.
Once the installation is complete you will be prompted to “press any key to return.” This will take you back to the Install/configure menu.
7. Now we can select configure (see figure 2).
You are now presented with the URLs to Install or Configure (which includes upgrading) a New GroupWise 2014 Server or Administer an existing GroupWise 2014 Server.

Accessing the GroupWise Installation Console
The installation routine will create two icons on your server desktop (see figure 3). One for GroupWise Installation and one for the GroupWise Administration console. These shortcuts are identical on all platforms. When the Administration Service is is first installed it is configured to run on port 9710.
The two URLs that are called by these icons are:
https://yourserver:9710/gwadmin-console/login.jsp
and
https://yourserver:9710/gwadmin-console/install/login.jsp
To access the Installation menu, right click on the Install or configure URL and select Open Link. This will open the Web page, pass the token to the installation and present the Installation console page.
Upgrading GroupWise Domains
The first step is to always upgrade the Primary domain. Once the primary domain is upgraded the remaining domains and components can then be upgraded to GroupWise 2014 R2.
At the domain level, a GroupWise upgrade is really just a database conversion from one version to another. The former GroupWise domain database (version 5.0 through 2014 works the same) is RECOVERED by the administrative thread and CONVERTED to the new version. For a Primary domain, this requires a few simple components and prerequisites:
- The Message Transfer Agent software must be at GroupWise version 2014 R2
- The .dc (dictionary) file in the domain directory must be version 2014 R2
- The Primary domain must be upgraded before any Secondary domain can upgrade.
- Secondary domains must have received the notification from the Primary Domain that the Primary has been successfully upgraded and that the Secondary domains are now permitted to be upgraded.
The actual process is as follows: the Admin Service makes a full copy of the wpdomain.db file in the same directory as the domain, and names it recover.ddb. Then the Admin Service also creates a file called creating.ddb in the domain directory.
Once the creating.ddb is created, the Admin Service puts an internal record lock on the primary domains wpdomain.db file; carves the file out from the header down, and places the information from the creating.ddb file into the wpdomain.db file. In GroupWise 2014 it also involves creating an Administration Console user and password as well as assigning Administration Ports.
Performing the Domain Upgrade
At this point we have installed the software required to take your domain to GroupWise 2014, but your domain has not actually been upgraded. This will not happen until you access the Installation Console and chose upgrade an existing system.
Use the Installation icon on your server desktop or the URL listed above to access the Installation Console (as in figure 4).
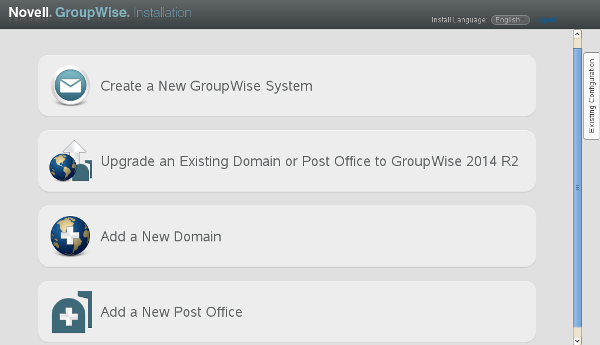
Perform the upgrade using the following steps
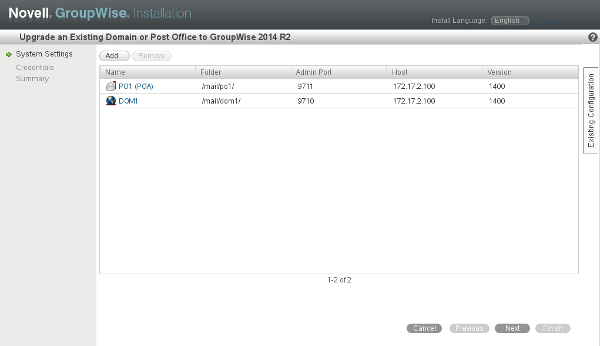
- Select Upgrade an Existing Domain or Post Office to GroupWise 2014 R2. This will display all Domains and Post Offices that are currently on this server (figure 5). If a domain has a GWIA it will automatically be upgraded at the same time. There are no additional steps required to upgrade a GWIA later. Select Next.
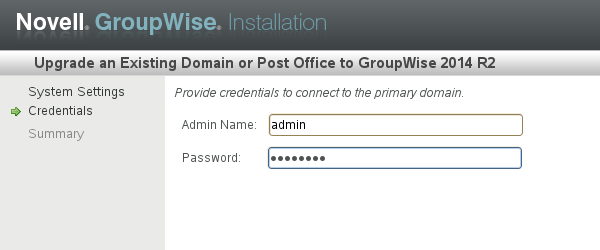
- If this is the primary domain you will be required to set an administrator and password for the GroupWise system. This is neither a GroupWise nor an eDirectory/AD user. The user is written to the domain database and is used when you launch the Administration console. If this is a secondary domain it will ask for the credentials to connect to the Primary domain.
- You will now see a Summary screen, Select Finish to complete the upgrade. The Admin Service, MTA and POA all have the ability to upgrade the pertinent databases. The process for upgrading is thus. The installation process copies the 2014 dictionary (.dc) files to the pertinent directories, and instructs the Admin Service to proceed to upgrade.
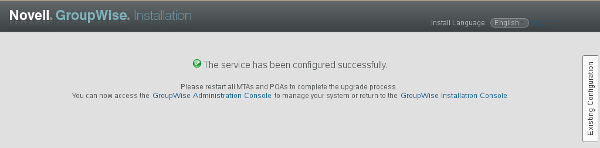
- Once the upgrade is successfully completed you will be presented with the screen shown in figure 7.
The GroupWise Administration Console
Once your GroupWise Domain is upgraded to GroupWise 2014 R2, you should no longer use ConsoleOne to manage those domain’s objects. In fact when you install the GroupWise 2014 R2 server on a Linux server, the GroupWise administration snapins are removed form ConsoleOne.
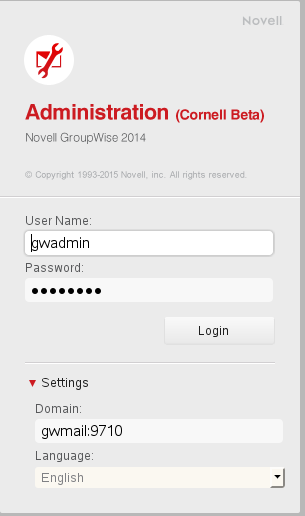
You can log into the Administration Console (figure 8) by using the icon on the server Desktop or using the URL
https://yourserver:9710/gwadmin-console/login.jsp
Use your existing GroupWise 2014 credentials or the ones created during the upgrade.
Once logged in you will see your GroupWise System Overview (figure 9).
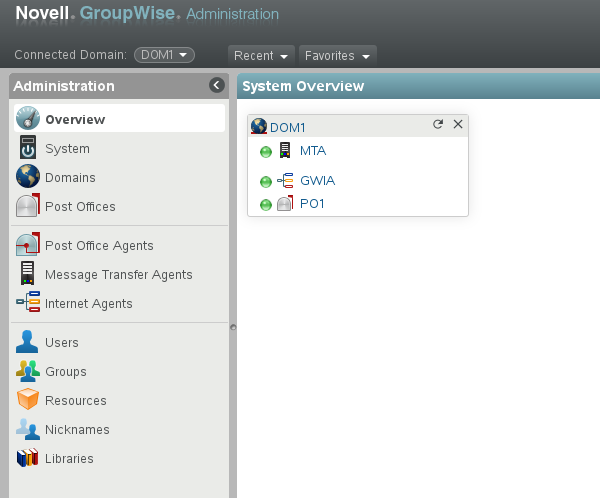
Verifying the Upgrade
When you have completed your upgrades and log into the Administration Console, you will see the System Overview. All components that have NOT been upgraded will show a version number next to its name.
To verify that an object has had its database converted to GroupWise 2014 R2, select the link to the object properties, then select the General tab. In our demo upgrade I have selected the DOM1 object (see figure 10).
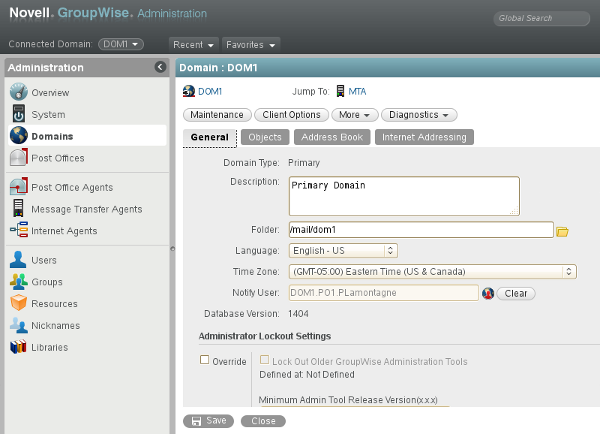
Notice that the database is now version 14.0.4. That is the database version for the Beta code currently being used at the time of writing this article. The final database number may change when the product ships.
You can do the same for the Post Office objects. The GWIA objects since they are a component of the Domain, do not have a database version.
Upgrading GroupWise WebAccess
With GroupWise 2012, Novell made some major changes to WebAccess, which continue with GroupWise 2014 R2. There is no longer a WebAccess Agent (GWINTER). The WebAccess Application now speaks directly to the Post Office Agent (POA) via the SOAP protocol.
Since there are no longer any directory objects for WebAccess, you will need to make configuration changes to the webacc.cfg file located in the /etc/var/groupwise/webaccess folder.
GroupWise 2014 WebAccess cannot service users on post offices that have not been upgraded to GroupWise 2014. You may need to leave an older version WebAccess for users whose post office have not yet been upgraded to GroupWise 2014 R2.
Once you have verified that the Post Office Agent is configured to use the SOAP protocol, you can continue with the upgrade.
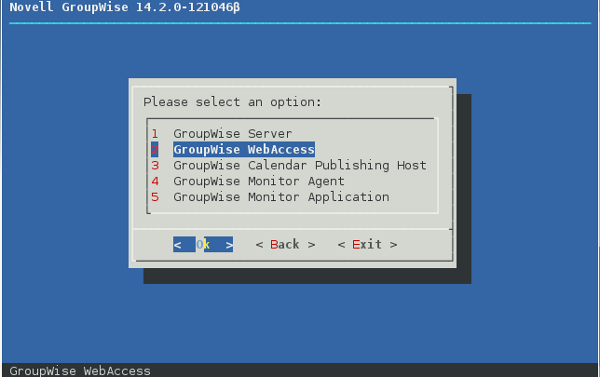
Use the same procedure as for installing the GroupWise Server above once you have reached the main installation menu. Select GroupWise WebAccess and you will then be presented with the Install or configure menu (figure 11).
The installation routine will copy the necessary files to the server (and check the server repositories for needed updates to server software). Apache and Tomcat will also be restarted.
Once completed you will receive the prompt press any key to return. When you press any key you are returned to the Installation or Configuration Menu.
We are now ready to configure WebAccess. Select Configure, then choose 1 to continue.
In the following figure (12) you will see the text that says Specify the network address and port of the Post Office Agent. You will only see the Port fleld after you enter the IP address.
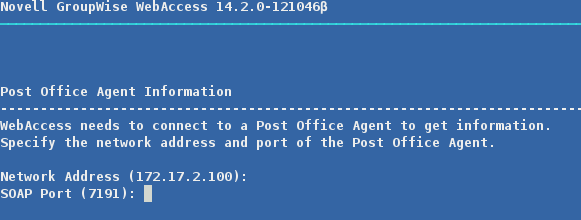
If you are upgrading from GroupWise 2012 or later, the previously configured IP address will be shown. Press enter to confirm it or enter the IP address. The same will happen with the Port number - the default is 7191.
The next screen is the same but for configuring the Document Viewer Agent. The default DVA port is 8301.
In a similar style the next screen indicates the location of Apache and Tomcat. Unless you have manually configured different instances of Apache and Tomcat, these paths should be correct.
Once again press any key to be returned to the Installation and Configuration menu.
While the installation should restart Apache and Tomcat, to be thorough, you should do the following steps :
/etc/init.d/apache2 restart
and
/etc/init.d/tomcat7 restart (stop/start?)
Test GroupWise WebAccess
You are now ready to test access to Groupwise WebAccess Open your browser of choice and enter the following URL: http://yourserver/gw/webacc. That should bring up the WebAccess login screen..
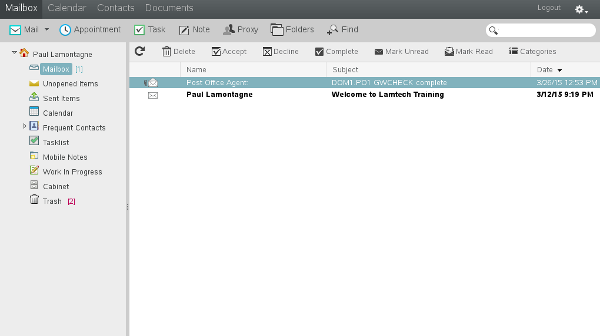
Enter valid credentials for any user account and you should now log into your WebAccess Application and see your current mailbox (similar to shown in figure 13).
Congratulations! You have successfully upgraded from any previous version of GroupWise to GroupWise 2014 R2
In a future article we will endeavour to show you how to upgrade your GroupWise Windows Client using the Auto-Update feature, SetupIP or Desktop management software such as ZENworks Configuration Management.
This article was first published in OHM Issue 30, 3/2015, p5-10
I see no mention of GMS and when it gets upgraded. Does it get upgraded prior to the GWPOA being upgraded to 2014 R2 (I suggest to do so). I would not want to see GMS 2.1.x running against a GWPOA 14.2.x.