
by Paul Lamontagne and Danita Zanrè.
In this article we’ll discuss how to deploy the GroupWise 2014 R2 client. Most customers find that upgrading the client is the last thing they do, simply because it seems to be time consuming and requires a lot of pre-planning. There are many ways to upgrade the GroupWise client, depending on the size and needs of your organisation. Smaller sites will have desktop administrators move from desktop to desktop, installing the new version of the client (and many sites use this as an opportunity to do other desktop cleanup that has been pending for a while). Other sites will want more automated solutions. We will look at a number of ways to get your GroupWise system upgraded quickly and smoothly.
Choosing Your Windows Client Installation Method
There are several methods that can be used to upgrade your users to the new GroupWise 2014 R2 Windows client.
- Manual installation: Download the combined client executable, and launch it manually at the desktop. You would then walk through the dialogs for the installation.
- Auto-Update Direct POA Access: This method relies on the client being notified through the Bump/Build number combination that there is new GroupWise software, and launches the installation when the client logs into the post office.
- Auto-Update with POA Access through a Web Server: Rather than having the POA Deliver the files, the auto-update redirects the user to a web server for download.
- Update through SETUPIP: This method allows you to distribute the client to remote (or local) users without going through the auto-update process. It is also very handy for rolling out a client upgrade to groups of users, rather than one at a time or at the post office level.
- Pushing the client upgrade through ZCM: If you use ZCM to manage applications for your users, you can push down the client through ZCM with no intervention by the user.
In this article we’ll discuss how the auto-update methods can work for your environment, as they are new with GW2014 R2, along with SETUPIP. Upgrading through ZENworks ZCM will be discussed in a further article. Also for brevity we’ll assume we’re discussing just the Windows client and a Linux server back-end.
The Auto-Update Algorithm
Before we actually get to configure the post office for the upgrade, we will discuss how the Auto-Update algorithm affects the upgrade process. GroupWise has a built-in mechanism for notifying the clients that it is time to upgrade. It is called the Auto-Update algorithm, and it is an integral part of the functionality of the upgrade. While Auto-Update is very similar to prior versions, there are some differences to take into account, primarily due to the removal of the Software Distribution Directory in GroupWise 2014.
The Auto-Update algorithm is used in conjunction with the client options, and can be controlled at the Domain, Post Office or even User level for distributing your clients.
In simple terms, here’s how the Auto-Update algorithm works:
- When you install the GroupWise server, the GroupWise Client installation files are copied to the server directories. This is automatic on Linux, and you are given the option to disable this on Windows (but it is the default to include the Client Auto- Update Repository). On Linux this is in /opt/novell/groupwise/agents/data/ and on Windows at c:\Program Files\Novell\GroupWise Server\data.
- When a post office is created, it gets a “bump” or software version number associated with it (0 at creation). The Bump Number is controlled by the Administration Console, and written to the wpdomain.db and wphost.db for the post office in question. This number is also written to the workstation’s registry. This has come to be known as the “Bump” number because it is called that in the Windows Registry. Internally to the GroupWise databases though, this is known as the Software Version number.
- GroupWise 2014 R2 has a version.ini file that has a Build Number in the file. This was formerly the software.inf file.
- The Client Options settings in the Administration Console define which users/post-offices/domains should be auto-updated.
All of these components work together to ensure that clients are notified of the update. We will use auto-update in some of our methods below, and show you other ways to deliver your software without using the auto-update mechanism.
Auto-Update through Direct POA Access
Follow these steps to set up your post office for Auto-Update through the direct POA access method:
- The installation routine copies the client files into the server directories.
- The client software is copied to the /opt/novell/groupwise/agents/data/client/setup/win32/ directory.
- In order to better control the client software installation, we need a new directory under here, also called win32. So you will need to create a directory so that you have /opt/novell/groupwise/agents/data/client/setup/win32/win32, and yes that is .../client/setup/win32/win32. You are not seeing double.
- There are a couple of files in the installation directory that do not get copied to the GroupWise server directories, and we will need them in this win32 directory.
<installationfiles>/client/setup.cfg
<installationfiles>/client/win32/setup.ini
Copy both of these files to <opt/novell/groupwise/agents/data/client/setup/win32/win32
You should then change them to reflect your wishes upon installation. We have samples of these files later in this article.
In prior versions of GroupWise, the setup.cfg file contained settings for enabling auto-update and controlling its use.
This has now been removed from the setup.cfg, and is now controlled in the Client Options in the GroupWise Administrative Console. Like all client options, these can be set by user, post office or domain. Let’s do an example of this for a specific post office.
- Log into the GroupWise Administration Console.
- Click on Post Offices.
- Choose your Post Office from the list of available Post Offices.
- Click on the Client Options tab.
- At the bottom left of the Client Options is Client Auto-Update. Click on that setting.
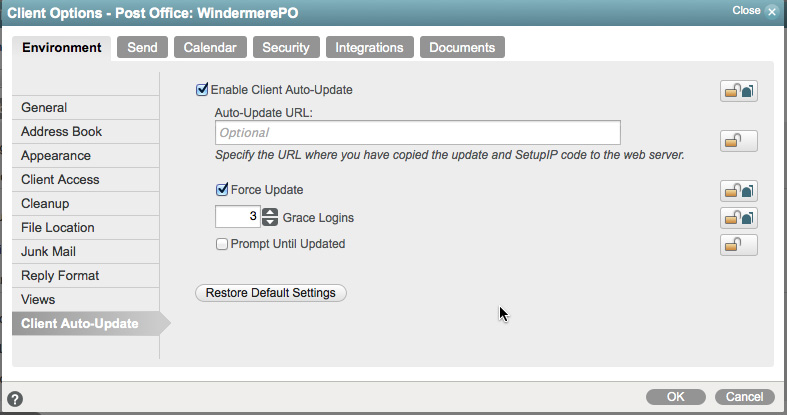
- In the Client Auto-Update settings you have some options, which we will discuss: (Figure 1)
- Enable: check this box to enable the auto-update.
- Auto-Update URL: We will discuss this in the next section. For this particular purpose, we will leave this blank.
- Force Update: This setting was formerly in the setup.cfg file. If you require your users to update then check this. This works in conjunction with:
- Grace Logins: How many times can a user be cancel the update before being forced to allow the auto-update to occur.
- Prompt Until Updated: If the user chooses to cancel the update, they will be nagged about it until the update is completed.
Finally, before anything will really happen, the administrator must increment Bump Number. The administrator cannot choose the Bump Number, only increment it. To better understand this, let’s look further at the Bump Number (or Software Version):
- In the GroupWise Administration Console, click on Post Offices, and then select the Post Office you wish to modify.
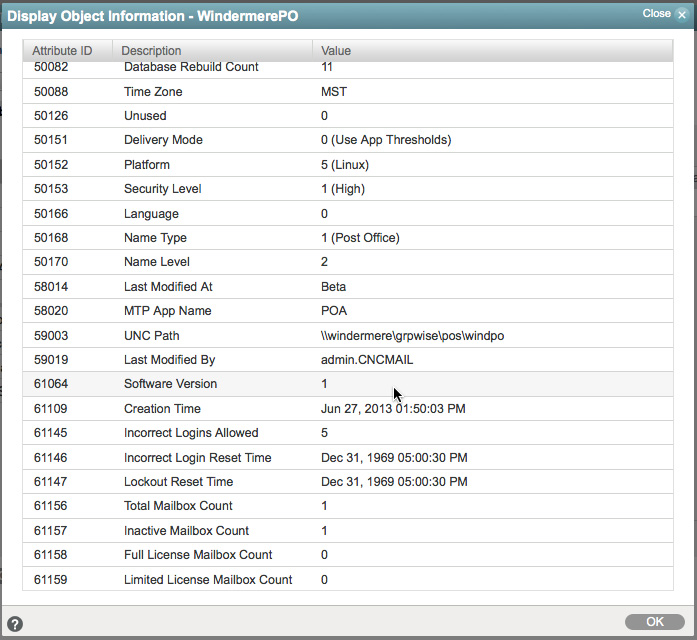
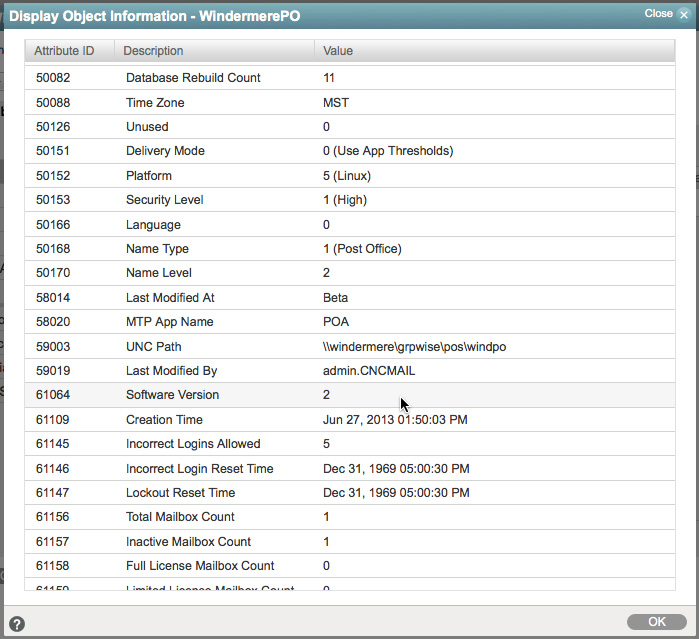
- In the Post Office settings, click on the Diagnostics dropdown along the top of the settings and select Display Object.
- Scroll through the listing until you find Software Version In our figure, this is version “1” (Figure 2) To increment the bump number for a post office, follow these instructions:
- In the GroupWise Administration Console, click on Post Offices, and then select the Post Office you wish to modify.
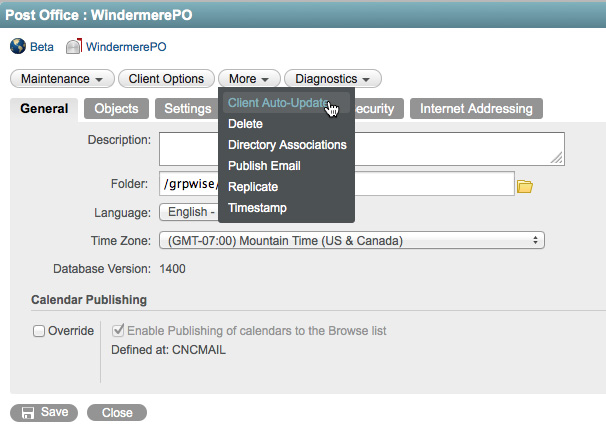
- In the Post Office settings, click on the More dropdown along the top of the settings.
- Choose Client Auto-Update (Figure 3)
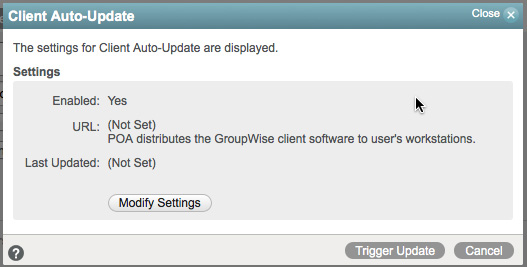
- When you click the Trigger Update, the Bump Number will change. (Figure 4)
- This increments the Bump Number for the post office by one. If you follow the above instructions again for Display Object, you will see that the Software Version is one higher than before, (Figure 5, over the page).
- As we will explain later, if you want your users to upgrade, clicking this button multiple times will not cause problems. However, clicking it just once when you do NOT want to upgrade will cause you some headaches!
The stage is now set to initiate your auto-update. The next time a user logs into the post office, the following exchange will occur:
- The client on the user’s PC will query the POA and ask what the Bump Number is.
- The client on the user’s PC then compares this Bump Number to the registry value in HKEY_LOCAL_MACHINE\SOFTWARE\Novell\GroupWise\Client\5.0\ NewSoftwareBump. For 64 bit machines, this is now in HKLM\software\ Wow6432node\novell\groupwise\client\5.0\NewSoftwareBump. If this number is different (higher or lower), then the client continues on to ask for the Build Number.
- The Build Number is found in both the version.ini file in the Client Software Update Repository, and in the workstation registry at HKEY_LOCAL_MACHINE\SOFTWARE\Novell\GroupWise\BuildNumber or HKEY_LOCAL_MACHINE\ SOFTWAREWow6432Node\Novell\GroupWise\BuildNumber. The client looks at this value, and if the new value in the version.ini file is higher, the client then continues the update query process.
- The client then compares the settings in Client Options that affect this user (so user/post office/domain), and if Update has been enabled, the upgrade begins.
It is important to note that the workstation must have access to write to the registry in order for the auto-update process to work. If the workstation cannot write the new Bump and Buildnumbers to the registry, it will not upgrade, and it will not give the user any indication that there is new software.
Once you know these key steps, it’s easy to see where odd messages users receive about software updates come from. Here are a couple that we see frequently:
There is new GroupWise software available; however you can not access it at this time. This error can occur if the bump number on the post office in question is different than the one in the workstation’s registry, and the Build Number is higher, but the user cannot receive the files. For a standard auto-upgrade through the POA, this should not happen, but if you are using a web server for the auto-update, and the web server is unavailable, you might see this message below.
There may be new GroupWise software available. However, the auto-update process was unable to access the GroupWise Software directory. Please contact your administrator.
This one is interesting, because it means that the bump number is on the post office rather than on the workstation, but the version.ini cannot be accessed to verify that the software is actually newer.
If you have an easy method to change the registry at your workstations, you can also simply change the value in the HKEY_LOCAL_MACHINE\SOFTWARE\Novell\GroupWise\ Client\5.0\NewSoftwareBump or HKLM\Software\Wow6432Node\Novell\GroupWise\Client\5.0 to “0”.
This will ensure that the Bump Number in the registry is different than what is in the wphost.db file, and will restart the upgrade query for all (or a subset if you choose to only change the registry for a group of users) of your workstations.
Auto-Update using a Web Server
We promised to explain the Auto-Login URL, and so here we are! In prior versions of GroupWise, the Software Distribution Directory (SDD) was used to distribute software for Auto-Update. While the POA was responsible to “hand off” the update of the software to the client, it was required that the user logged into the Windows workstations have read rights to the Software Distribution Directory in order to run the installation routine.
GroupWise 2014 and subsequent releases have abandoned the SDD, and have instead compressed the installation files at the Post Office server. In order to continue to provide auto-update for even the smallest of sites with very limited server resources and administrative staff, auto-update at the POA was developed, so that out-of-the-box, without too much additional configuration, auto-update could be delivered to users.
Thus, if you use the direct access as described above, the POA will actually deliver the installation files to the users for decompressing and installation.
On an already very busy post office, this can cause some slowdowns first thing Monday morning when all of your users arrive and are presented with the auto-update option! To alleviate this, Novell has added a new “web server delivery” method for auto-update. This is very similar to SETUPIP, but requires less configuration, and is still reliant on the Auto-Update algorithm we described above.
Preparing the Web Server
The steps will be very similar to the above but the first thing you must do is configure your web server. We will not go through installing and setting up a web server for you. Refer to the documentation of the server on which you wish to install web services.
There is no reason why you cannot use your GroupWise WebAccess server for this purpose, or you could fire up a small server for the dedicated purpose of providing GroupWise client installation functionality.
The steps are the same for Apache2 on Linux or IIS on Windows. You must simply start at your document root. On SLES/OES, this is /srv/www/htdocs. On IIS it is c:\inetpub\wwwroot. We will refer to this from here on as simply <documentroot> for both platforms.
- Create a new folder under the document root. You can name it anything you like, but gwclient seems reasonable!
- The installation routine copies the client files into the server directories.
- The client software is copied to <serverfiles>/agents/data/client/setup/win32/ directory. Copy the entire <serverfiles>\agents\data\client\setup\win32 into your web server <documentroot>\gwclient folder that you created above so that you have <documentroot>/gwclient/win32 on the server.
- In order to better control the client software installation, we need a new directory under here, also called win32. So you will need to create a directory so that you have <documentroot>/gwclient/win32/win32 (yes, that’s two win32 folders).
- There are a couple of files in the installation directory that do not get copied to the GroupWise server directories, and we will need them in this win32 directory.
<installationfiles>/client/setup.cfg
<installationfiles>/client/win32/setup.ini
Copy both of these files into <documentroot>/gwclient/win32/win32.
You should then change them to reflect your wishes upon installation. We talk more about these files later.
Apache Specific Settings
On Apache on Linux, depending on the settings of your server, you may need to give specific access rights to this folder structure before the web server will actually deliver files for you. So perform the following steps for this.
- Go to the /etc/apache2/conf.d folder on your Linux server.
- Create a new text file here and call it something like gwclient.conf. The name is not really important as long as it has a .conf extension. Just name it something that will make sense to you later.
- Place the following contents in this file:
<Directory/srv/www/htdocs/gwclient>
Options Indexes
AllowOverrides None
Order allow,deny
Allow from all
</Directory> - Restart Apache2. i.e., type rcapache2 restart
Web Server Cleanup
Both Linux and Windows leave some files around that will cause trouble with the download of the GroupWise files.
On Windows, specifically, there is a file called web.config in your document root (typically c:\inetpub\wwwroot). This file, while important, will trip up the download of your GroupWise files. To avoid issues, right-click on the file, go to Properties and change the file to “hidden”.
For both servers, look in the win32\win32 directory for any temporary files that might have been created when you were editing the setup.cfg and setup.ini files. On Linux these typically end with a ~ - for example, setup.cfg~. These extraneous files can cause download issues. Delete them.
Test the Software Availability
Regardless of your web server platform, you should test to verify that the client software is available from a browser. Follow these instructions to do so:
- From your browser, navigate to http://web_server_address/gwclient (assuming this is the directory you chose for your installation).
- Verify that you can see the files and/or directories related to your installation.
Enabling Auto-Update
As already mentioned setup.cfg no longer contains the settings for auto-update which are now controlled in the Client Options tab in the GroupWise Administrative Console. Like all client options, these can be set by user, post office or domain. The steps are the same as in the previous example except that in the Auto-Update URL box you enter the path to your web server copy of the software, including the gwclient directory. (Figure 6).
Again as in the previous example before anything will really happen, the administrator must increment the Bump Number.
Setup.ini and Setup.cfg Settings
Setup.ini
The setup.ini file in the <installationfiles>\client\win32 directory is full of interesting settings for the Microsoft Installer. It also has one very important setting that you will want to set if you wish to totally automate your installation. You can disable the language dialog in the installation by verifying that the EnableLangDlg setting is set to No (N).
Setup.cfg
As previously discussed setup.cfg no longer contains the settings for the auto-update, as those have been moved to the Client Settings in the databases. However it is still a very important file in the installation process. There is a setup.cfg file that ships with GroupWise 2014 in the <installationfiles>\client directory. This is a template file that is used for customising the GroupWise client installation.
This file does not have an effect on the installation of the GroupWise software unless it is copied to the <serverfiles>\agents\data\client\setup\win32\win32 directory. If the setup.cfg resides in this directory, it will be used to set parameters for the client installation. There are a number of options you can set for the installation through the setup.cfg file. Here are some of the more common:
- If you wish to make the installation automatic for the users so that they are asked no questions and only see the progress and ending of the installation:
ShowDialogs=No
ShowProgress=Yes
ShowFinish=Yes
(Remember: check the setup.ini file for EnableLangDlg=No) - GroupWise Notify will not be put in the Windows startup folder
Notify=No - Enable GWCheck at the workstation for Caching clients
[GWCheck]
InstallGWCheck=Yes
GWCheckEnabled=No - The Language will be English (or your language of choice).
[Language]
Default=English
English=Yes
Auditing the Client Upgrade
The GroupWise 2014 POA has a feature that can give you a quick look at who has upgraded to GroupWise 2014. In order to see this feature your GroupWise 2014 POA should support HTTP monitoring and your post office must have enabled the setting for tracking a minimum client version. You can either enable HTTP monitoring in the Administration Console or in the startup file of the POA. The advantage of using the Administration Console to apply these settings is that the POA will pick up the settings dynamically and you will not need to restart the post office agent.
The minimum client version settings will highlight in red the version number or release date of the GroupWise client for any user who is using a client older than the version or date you indicate. Below is how you can enable these settings through the Administration Console:
- Click on Post Offices
- Click on the Post Office you wish to monitor.
- Click on the Client Settings tab.
- Enter the version you would like for your Minimum Client Release Version (14.0 would represent the GroupWise 2014 client).
- Make sure you do not check the box next to the Minimum Client Release or only your GroupWise 2014 users will be able to log in.
- Click Apply, then OK to exit.
If you check the check box to Lock Out Older GroupWise Clients then users will get a message before even entering their GroupWise password that states The version of GroupWise you are using is older than the minimum version allowed by the system administrator.
You need to be careful about enabling the lock out function, as the user will not even be given the opportunity to update their client if you select this option. You may be better off using the Grace Login option in the Client Options to give the user X number of grace logins before they are forced to update.
After enabling these settings you can monitor the client versions from your browser. Go to the POA’s HTTP port in this manner from your browser:
http://192.168.100.238:7181
If you are not sure what HTTP port your POA is using, you can hit the C/S port (by default 1677) and it will redirect you to the HTTP Port.
You may then be prompted for the User Name and Password for the POA HTTP Monitor. Once you have loaded the Web monitor for the POA, click on the C/S Users link. From here you can view the version of GroupWise client that your various users are using. Any user that is using an older GroupWise client than you specified will show up in red. Any user that is using at least the GroupWise client version you have specified will show up in blue.
Upgrading with SETUPIP
Earlier we discussed how you can now trigger auto-update by domain, post office or even user. However, there is no way to multi-select subsets of users and edit their client options, or change the client options of a group.
This is where SETUPIP really shines, because you can configure a distribution of the GroupWise client, and then you can simply distribute a small executable to multiple users (via email, or placing it on a web server for download) and manage a more controlled rollout of the client.
SETUPIP requires a web server to serve up the client files. When you deliver the GroupWise client using SETUPIP, it downloads a compressed version of the GroupWise client from a file called setupip.fil. Any additional languages you wish to include will only add 3-5 MB per language to the download.
After everything is downloaded, SETUPIP launches the GroupWise client setup.exe installation program from the users local hard drive and the installation begins.
Additionally, SETUPIP can be used to install GroupWise fresh on a PC that has never had GroupWise before. This allows you to get the client to remote workers who have never had their laptops in the office!
The procedure for setting up the webserver is similar to previously described. The Apache and IIS specific settings are the same as well. You should also clear up extraneous files as discussed in the previous section.
If you wish to cater for multiple languages then in the win32 folder you will have all of the available language files (e.g. setupip.xx, where xx is an appropriate language designation such as en for English or fr for French- France. If you have more than one language file the client will be presented with a list of languages that can be downloaded and extracted. If the user selects more than one language, the GroupWise Client will be installed in all of the selected languages. You should remove all language files from this folder for languages that are not needed for your organisation.
If only one language file exists, users will not be prompted to select languages for the installation. If you require more than one language file for your system, configure your setup.cfg file to set the default language. Then indicate “Yes” for any languages you wish to have installed. Otherwise only the default language will be installed.
Configure and Generate the setupip.exe Executable
The setupip.exe file is used to download and launch the GroupWise client installation over an IP connection to a web server. When executed, the setupip.exe file downloads the compressed GroupWise client and then launches the setup.exe file. The setupip.exe file contains the location (URL) to your web server(s) where you have hosted the GroupWise client as explained previously. The procedure to create the setupip.exe file is a Windows application (writeip.exe).
If your GroupWise server is on Linux, this presents a bit of a complication, because you have not “installed” server files on Windows in order to extract these files. There are a couple of ways to get access to these files for our purposes. A few ideas are:
- If this is an OES server, place the <serverfiles>/agents/client directory and your <installationfiles> on a NCP accessible drive.
- Configure SAMBA for shares to the <serverfiles> and <installationfiles> and map drives from Windows to these SAMBA shares.
- Download the Windows GroupWise full distribution and extract the files by doing the following:
- After downloading the full Windows distribution zip file, right-click on the file and choose “Extract All” and place it in a directory of your choice. For example c:\temp\gwinstall. This would then serve as your <installationfiles> directory for the rest of this SETUPIP section.
- Change to this new <installationfiles>\server\win64 directory
- Run setup.exe /extract c:\temp\gwserver (or any location you choose). Use this location as your <serverfiles> location for accessing the required client files.
Our preference is actually the latter. In any event, you must have access from Windows for this process!
To generate your setupip.exe follow these steps:
- From your <serverfiles>/data/client/setup/win32 folder, run the utility called writeip.exe.
- In the WRITEIP utility fill in the DNS name or IP address of the web server with the appropriate location to the GroupWise client directory on the web server. Based on the previous section this would be http://<your server IP or DNS name>/gwclient
- After filling in the information in the WRITEIP utility select the OK button, which will generate a new executable in the <serverfiles>/agents/data/client/setup/win32 directory called setupip.exe.
- Copy the setupip.exe file to the into the <documentroot>/gwclient directory of the web server.
- You can instruct users to set up their GroupWise client by going directly to http://yourserver. com/gwclient/setupip.exe - then when they download this file, the installation of the client will begin.
- Alternatively, you can email the setupip.exe to your users. Instruct them to save the attachment locally, close GroupWise and run setupip.exe to upgrade.

You can define multiple web servers for the GroupWise client download. This allows the client to be downloaded randomly from the sites you define if you check this option. Otherwise, if the first web server is down, the client will be downloaded from the next web server on the list. If you are providing SETUPIP functionality for users both on your network and across the Internet, you might want to provide URLs with both private and public IP addresses to the same web server location.
Troubleshooting SETUPIP
The SETUPIP utility makes a file called setupip.err in the Windows program directory. The Windows program directory is usually c:\windows. If you experience problems with SETUPIP, look at this file for some clues. Some of the more common problems with SETUPIP are:
- Not putting in the entire path to the files in the http: links
- Not configuring the web server to be able to access the files
- Having errors in the gwclient.conf on Apache
In the next article we will discuss upgrading the GroupWise client using ZCM but we trust that this article will get you on your way to finishing up your GroupWise upgrade. Good luck!
This article was first published in OHM, Issue 33, 2016/2, p9-15