
For many organisations the reality of a Standard Operating Environment is that you have to deal with lots of non-standard requirements. Every site, department, role or even user might want or need something that is specific to them such as applications, hardware or configuration. So how to best deal with these requirements without deploying everything to everyone, creating a number of different deployment processes or perish the thought… creating separate Windows images!
ENGL Imaging Toolkit™ was born out of exactly these type of requirements and therefore has the innate ability to dynamically change the deployment process based on specified criteria. There are clearly some things that can be easily determined such as computer type, IP address or ZCM imaging server but these are not always granular enough for deployment scenarios that delve down to a user’s role or department.
Stage 1: What, Where and Who?
The Windows deployment process starts with a PXE or media (USB/DVD) boot into the ZENworks imaging environment (Linux or WinPE). This is the time to gather any information that is required for deployment but that cannot be determined from the network environment, e.g. department or role. Imaging Toolkit can provide a user-friendly way to gather and validate this information without the need for a highly qualified Windows deployment engineer, in fact said engineer is sitting comfortably at their desk monitoring the process (more on this later).
The advantage of this approach is that the amount of time required “in front” of the machine is limited to a few minutes and is only required the first time a machine is deployed. Once the information has been gathered it will be stored to the ENGL BuildData section of ZENworks Image-safe Data (ZISD) and will live with the machine for its lifetime. In this example the BuildData variables are stored based on the following:
| Variable Name | Used for | Source |
| ENGL_TZ | Windows time zone setting | Determined by the site |
| ENGL_GEO_ID | Windows geographic location setting | Determined by the site |
| ENGL_REG_KEY | ZCM registration | Determined by site |
| ENGL_ROLE | ZCM workstation group membership | Determined by department |
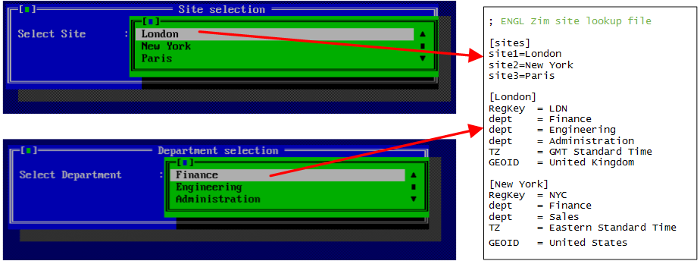
These values are stored in an INI file format which is used as a look-up for the menus. Figure 1 provides an example of the menu options and how they relate to the sites.ini look-up file.
At this stage the biggest differentiator is the physical (or virtual) machine hardware, Imaging Toolkit will detect the hardware type and automatically establish whether the machine is a UEFI or BIOS machine. Based on the machine type, GPT or MBR partitions are created and the base Windows OS image is restored along with the project images. Finally a drivers image specific to the machine and OS being deployed is restored. More details on the imaging process and driver image creation can be seen in the ENGL Imaging Toolkit 9.0 video series at https://www.engl.co.uk/products/imagingtoolkit/videos The deployment process will start and run through to completion without any intervention, most importantly the actions will be based on the selections made and the resulting variables.
Stage 2: Dynamic deployment process
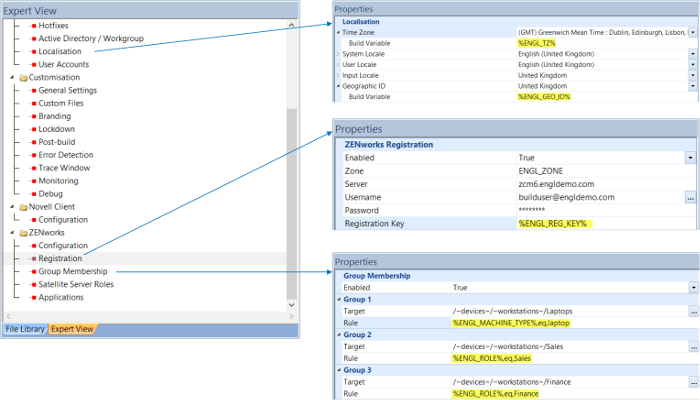
The deployment process will carry out some common tasks such as installing drivers and the ZCM Adaptive Agent, after that tasks are controlled based on dynamic variables to determine what happens next. At the start of the process a site and a role were selected and this information was stored in the ENGL BuildData section of ZISD. This information is automatically read and Windows environment variables are created, these variables are used to control deployment process action, in this case for Windows localisation and ZCM registration.
Figure 2 shows how the variables are used to determine time zone (ENGL_TZ), geographic ID (ENGL_GEO_ID), ZCM registration key (ENGL_REG_KEY) and ZCM group membership using the machine type (ENGL_MACHINE_TYPE) and role (ENGL_ROLE).
Extending this idea a little further, we can deliver applications based on role/department/site by checking bundle assignments for the device or user and installing only the bundles required. This approach requires you to have a bundle for every application that you want to deploy to any machine in the organisation. The Installer bundle will contain an “Install Bundle” action for every bundle that you want installed on any machine, anywhere in the organisation… but don’t panic, this is not “deploy every application to every machine”. Using Imaging Toolkit’s Application Logic Rules only the bundles that correspond to the site, role or user the machine belongs to are distributed and installed.
Bundle Commander from ROVABU Software is a great solution for creating and configuring your application bundles so that they behave nicely during the automated deployment process, it also has the ability to configure the bundles listed within the “Installer” bundle used by Imaging Toolkit for application delivery.
Stage 3. Keeping a watchful eye
In a perfect world every machine would deploy without any kind of network/server/power issue and we could all relax… in reality sometimes there are conditions that will cause the deployment to fail. As we mentioned earlier our Windows deployment engineer can monitor every machine running through the deployment process, right down to the deployment task currently in progress.
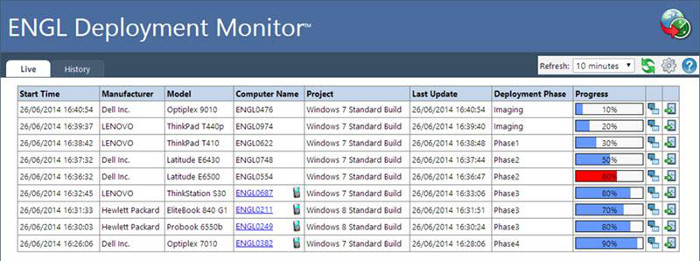
The ENGL Deployment Monitor™ web console (figure 3) displays the progress of each machine, if a machine encounters an error during the process it is highlighted in red. In addition workstations registered in ZCM can be remote controlled using the ZENworks Remote Management tools direct from the console, so if for example an application installation fails then the engineer can remote control the machine to troubleshoot the issue.
With a fully automated and monitored process in place the possibilities for “any time” deployment are endless. Machines can be deployed in a “build room” environment using multicast, re-deployed overnight using Wake-on-LAN or even deployed by the end-user on request.
To discover more please visit www.engl.co.uk