Kablink is the name for the open source version of Micro Focus Vibe – the online collaboration and document management platform. I needed to do some development work so had to look at how the code runs, and wanted to do this using the Eclipse IDE (development environment).
Kablink comes in two flavours, first the installation executable, second the source code. Both can be downloaded from sourceforge: https://sourceforge.net/projects/kablink/. Kablink is a web application written in Java and using Apache Tomcat as its web server.
The challenge is to run the source code in such a way in the Eclipse development environment that Kablink can be debugged while running. More specifically the challenge targeted in this document is debugging the main source code located here: https://sourceforge.net/p/kablink/code/HEAD/tree/tags/Vibe-4.0.0-FCS/main/src/
This article will outline the way the author managed to accomplish that. A knowledge of Eclipse is helpful but I hope this article shines some light on how to make progress.
Please note that there is plenty more source code that is challenging to debug (for example the GWT code) but this document focuses on the main code. The author believes however that technique described in this article can be expanded to cover other source code areas as well.
Once Kablink is running in Eclipse you can start developing and investigate more closely how Kablink really works.
Approach
In the end whatever runs in Tomcat is “the truth” so it makes sense to try to run the installed files in Eclipse. Tomcat makes this particularly easy by allowing it to be run split in two directories. using the environment variables catalina.base and catalina.home.
catalina.home designates the command line, bootstrap (bin) and shared library (lib) files. Because these files are usually not changed on a production server.
catalina.base designates the “personal” files. They are the server configuration files (conf), log and output files (logs), the web application files (webapps) and the temporary working directory (work).
The approach in this document is to create a new empty Eclipse Java project and move into it the bin and lib folder from the Kablink installation Tomcat folder.
Then we run Tomcat inside Eclipse in debug mode using a Run Configuration.
Installation
The first step if not already done is to install Kablink. Sourceforge provides the setup files here: https://sourceforge.net/projects/kablink/files/Kablink%20Vibe/4.0.0%20FCS/
I am using version 4.0.0 FCS (first customer shipment)
This will give you a server directory and a data directory. In the server directory you will find a folder called apache-tomcat. This is the folder where we will move the bin and lib folder to the Eclipse Java project folder, thus leveraging the split base and home configuration.
The Kablink installer will notify you that you need the Java Cryptography Extension (JCE) Unlimited Strength Jurisdiction Policy Files. These files enable much stronger key length when using encryption in Java.
You can get the one for Java 8 from:
http://www.oracle.com/technetwork/java/javase/downloads/jce8-download-2133166.html
And the one for Java 7 here:
http://www.oracle.com/technetwork/java/javase/downloads/jce-7-download-432124.html
NB. Please remember exactly where you install the files as you will need to use the same Java runtime in Eclipse in the next step!
Kablink source code
There are a couple of ways to get the Kablink source code needed for this guide.
First you can browse to: https://sourceforge.net/p/kablink/code/HEAD/tree/tags/Vibe-4.0.0-FCS/ and download the snapshot of the complete source code.
Alternatively you can go into the main folder and then download only that, since it is all we are using in this guide.
Finally you can use a Subversion client to download the source code.
Eclipse Java project
Since we are not using the Eclipse Tomcat plugin from the WTP project (web tools platform) we can use the basic “Eclipse IDE for Java Developers” instead of the “Eclipse IDE for Java EE Developers”.
Inside Eclipse create a new Java Project. Give it a name like “VibeLive”. Make sure that you use the same Java runtime that has the JCE unlimited policy files from above. Select “Create separate folders for sources and class files”. Click on Next.
Make sure the “Default Output Folder” ends in “classes” and not “bin”. Click on Finish.
Now open the folder in your operating system’s file browser. Move the bin and lib folder from the Kablink apache-tomcat folder into your new Eclipse project folder.
Remove the kablink-teaming-main.jar from lib/ext. This file is the compiled and packaged version of the Kablink main source code.
From the Kablink source code you downloaded earlier please copy or move the contents of the Vibe-4.0.0-FCS/main/src folder to the Eclipse Java project’s src folder.
Inside the Vibe-4.0.0-FCS/main/src folder are two folders: com and org. Those are the ones to be moved.
From the Kablink source code please copy or move the contents of the Vibe-4.0.0-FCS/main/hibernate folder to the Eclipse Java project’s src folder.
Inside the Vibe-4.0.0-FCS/main/hibernate folder are also two folders: com and org. Those are the ones to be moved. You might be asked if you want to overwrite existing files. Please choose yes. These folders only contain the hibernate mapping XML files.
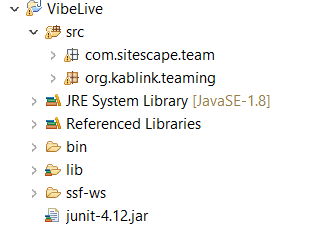
Go back into Eclipse and refresh the project, you should now see all the new folders. I prefer the “Package” view in Eclipse over the “Project” view (see figure 1). Your mileage may vary.
You will now get a lot of compile errors in Eclipse. That is because the source code is dependent on the library files. To fix this you simply need to add the libraries from lib/ext to the Eclipse project classpath. The way I like to do this is to right click on them in the Package Explorer and right click and select “Build Path” >“Add to Build Path”.

Since there are so many it is better to do it in groups of 20 or so. Be careful to not add any files that do not end in *.jar, of which I believe there are two. Make sure not to add them to the classpath or you will get compile errors until you remove them again.
Finally add the servlet-api.jar from the lib folder to the classpath as well. This should fix the most errors and only 6 or 7 should remain.
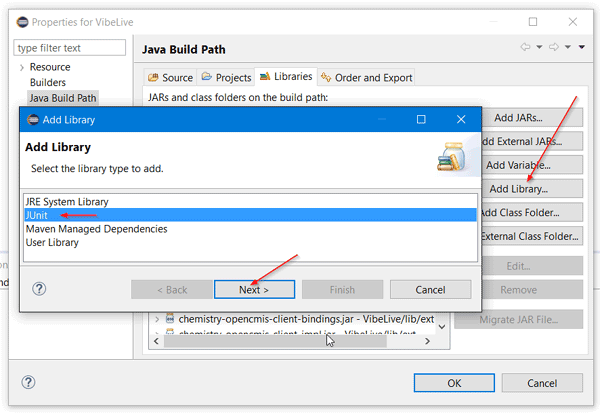
Some files need JUnit. This can easily be fixed. Go to the project settings and the “Java Build Path” settings. Click on Add Library… select JUnit 4 and click on Finish. (Figure 3).
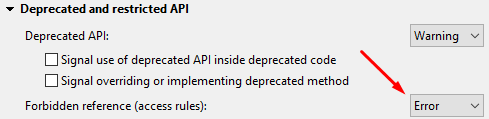
Next you need to Change restricted access in compiler options to Warning, because Vibe uses some old JPEG classes (Figure 4).
Here is a list of the remaining errors and how to fix them:
- in org.kablink.teaming.groovy.GroovyScriptService.java
- remove import com.liferay.util.StringUtil;
- replace paths = StringUtil.split(overridePaths, “,”); with paths = overridePaths.split( “,”);
- in org.kablink.teaming.portlet.widget_test.EventController.java
- remove import javax.servlet.jsp.PageContext;
- in org.kablink.teaming.sec..auth..impl.AuthenticationManagerImpl.java
- remove import com.liferay.util.Validator;
- replace if(Validator.isNotNull(emailAddress)) with if(emailAddress != null)
- in org.kablink.teaming.web.util.PortletRequestUtils.java
- remove import org.apache.slide.util.logger.Logger;
Alternatively you can of course also hunt for the jar files that contain these methods.
Since we next need to compile the main code into the project classes folder we need to tell Tomcat about it: Modify the catalina.properties file to include:
${catalina.home}/classes.
The file is located here: apache-tomcat/conf/catalina.properties. Around line 49 you should find this directive:
common.loader=${catalina.base}/lib,${catalina.base}/lib/*.jar,${catalina.home}/classes,...
Note that I added ${catalina.home}/classes.. Please do the same. Make sure compiled files actually go into that classes folder!
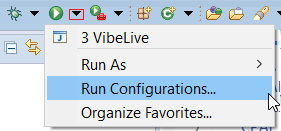
Finally create a new Run Configuration in Eclipse (Fig 5) with these settings:
Main
Main class: org.apache.catalina.startup.Bootstrap
Arguments
Program argument: start
VM arguments: -Xms256m -Xmx1g -Xss2m -Dcatalina.base=”C:\Coding\Server\Vibe\apache-tomcat” -Dcatalina.home=”${workspace_loc:VibeLive}”
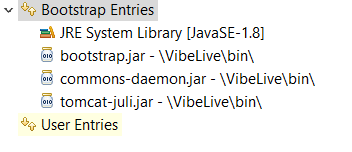
Classpath
Bootstrap classpath: bin/*.jar
User entries: remove everything
Make sure the User Entries is empty in the Run Configuration. (Bootstrap will use its own classpath)
Also make sure to replace the absolute path to apache-tomcat with your local installation folder in the Arguments section above!
Run the Run Configuration and you should be able to run, use and debug Kablink/Vibe. To stop Tomcat simply copy the Run Configuration and replace start with stop.
This may seem a lot of work, but once you have Kablink running in Eclipse you can then start on the real work of adding functionality or making changes to the underlying database. You are on your own and not supported by Micro Focus, but as it’s an open source project report back and talk to Micro Focus about your progress.
This article was first published in OHM Issue 37 (2017/2), p26-28.